
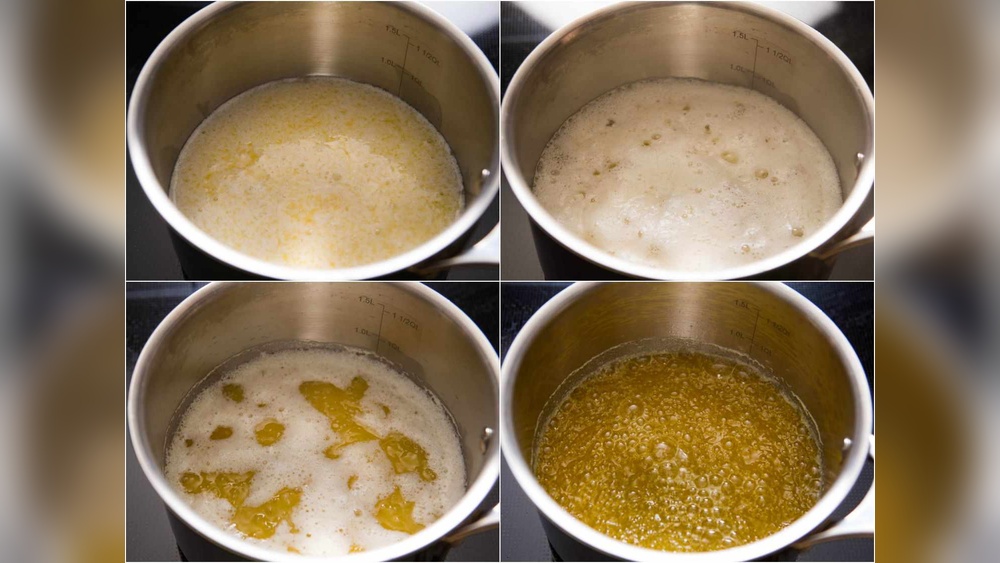
Making clarified butter, often known as ghee, is a culinary technique that transforms ordinary butter into a stable, flavorful fat with a high smoke point and extended shelf life. This process involves slowly heating butter to separate its milk solids and water content, leaving behind a pure, golden liquid.
The resulting clarified butter is a versatile ingredient, prized in kitchens worldwide for its nutty aroma, rich taste, and ability to withstand high cooking temperatures without burning. Whether you’re a seasoned chef or a home cook looking to elevate your dishes, understanding how to make clarified butter is an invaluable skill.
The allure of clarified butter lies in its transformed properties. By removing the milk solids, which are prone to burning at high heat, clarified butter achieves a significantly higher smoke point than regular butter. This makes it ideal for searing meats, sautéing vegetables, and frying, where precise temperature control is crucial.
Furthermore, the clarification process removes lactose and casein, the primary components of milk that can cause digestive issues for some individuals, making it a suitable option for those with dairy sensitivities. Its concentrated butter flavor, often described as nutty and caramelized, adds a delightful depth to a wide array of culinary applications, from delicate pastries to savory pan-fried dishes.
Key Takeaways
- Clarified butter (ghee) is made by simmering butter to separate milk solids and water.
- The process yields a cooking fat with a higher smoke point and longer shelf life than regular butter.
- Clarified butter is versatile, suitable for high-heat cooking, baking, and as a flavorful finishing oil.
- It can be made at home with just butter and a saucepan, requiring minimal equipment.
- The milk solids removed can be saved and used for other culinary purposes.
- Proper storage is key to maximizing shelf life, with refrigeration extending it significantly.

Understanding The Science Behind Clarified Butter
The transformation of butter into clarified butter is a fascinating process rooted in basic chemistry and physics. Butter is an emulsion, a mixture of fat globules suspended in water, with small particles of milk solids (proteins and sugars) also present.
When butter is heated, these components begin to separate. The water, having a lower boiling point than fat, evaporates first. The milk solids, being denser and less soluble in fat, sink to the bottom of the pan and eventually brown.
Clarified butter is the pure, golden fat that remains after these components have been removed.
The key to successful clarification lies in gentle heating. Rapidly boiling butter will cause the milk solids to scorch, imparting a burnt flavor to the final product. Slow, steady heat allows the water to evaporate gradually and the milk solids to separate cleanly without burning. This careful separation is what gives clarified butter its distinct characteristics: a high smoke point, a rich flavor, and a long shelf life.
The Role Of Water And Milk Solids
Water constitutes about 15-18% of regular butter. As butter heats, this water turns into steam and escapes. This is the initial bubbling and foaming you observe. The milk solids, primarily casein (a protein) and lactose (a sugar), are responsible for browning and burning at lower temperatures. By removing them, we eliminate the elements that limit butter’s high-heat performance. The result is a fat that is nearly 100% pure butterfat.
Smoke Point Explained
The smoke point of a fat is the temperature at which it begins to break down and produce visible smoke. This breakdown not only imparts an unpleasant burnt flavor but also releases harmful compounds. Regular butter has a smoke point of around 300-350°F (150-175°C), making it unsuitable for high-heat cooking methods like searing or frying. Clarified butter, with its pure fat content, boasts a smoke point of approximately 450-485°F (230-250°C), significantly expanding its culinary applications.
How To Make Clarified Butter: A Step-by-step Guide
Creating clarified butter at home is surprisingly simple and requires minimal equipment. The process is largely hands-off, allowing you to attend to other kitchen tasks while it simmers. The primary ingredients are, of course, butter, and the main tool is a heavy-bottomed saucepan.
Essential Equipment And Ingredients
- Unsalted Butter: It’s recommended to use unsalted butter to have better control over the salt content in your clarified butter. Salt can sometimes interfere with the separation process and may contribute to faster browning of the milk solids. Opt for good quality butter, as its flavor will be concentrated.
- Heavy-Bottomed Saucepan: A heavy-bottomed pan distributes heat evenly, preventing hot spots that could scorch the butter. A saucepan with a wider base is also beneficial as it increases the surface area, allowing water to evaporate more quickly.
- Fine-Mesh Sieve or Cheesecloth: This is crucial for straining the clarified butter to remove any remaining milk solids.
- Heatproof Bowl or Jar: For collecting the clarified butter. Glass jars are ideal for storage.
The Clarification Process
- Cut the Butter: Start by cutting the butter into uniform cubes. This helps it melt evenly.
- Melt on Low Heat: Place the butter in the cold saucepan and set the heat to low. Avoid high heat, as this can cause the butter to brown too quickly.
- Simmer and Skim: As the butter melts, it will foam. Continue to heat it gently. You’ll notice the water separating and evaporating, and the milk solids will begin to settle at the bottom of the pan. During this stage, a foamy layer will form on top. You can skim off this foam with a spoon periodically. This helps to remove impurities and results in a clearer final product.
- Observe the Stages: The butter will go through distinct stages:
- Melting: The butter turns into a clear liquid.
- Simmering: Water evaporates, and the liquid becomes more transparent.
- Separation: The milk solids begin to sink to the bottom, and the liquid on top becomes clearer and golden. The foam on top will subside.
- Browning (Optional but desirable for ghee): If making traditional ghee, you’ll continue to simmer until the milk solids at the bottom turn a light golden brown and release a nutty aroma. For a milder clarified butter, stop before this stage.
- Strain Carefully: Once the milk solids have settled and the liquid is clear (or lightly browned for ghee), remove the pan from the heat. Let it sit for a minute to allow the solids to settle further. Carefully ladle or pour the clear golden liquid into a heatproof bowl or jar, leaving the milky solids at the bottom of the pan behind. For an extra clear product, line a sieve with cheesecloth and strain the liquid through it.
Tips For Success
- Patience is Key: Do not rush the process. Low and slow is the mantra for successful clarification.
- Watch for Burning: Keep a close eye on the milk solids at the bottom. If they start to turn dark brown, you’ve gone too far and may have a burnt flavor.
- Use Fresh Butter: Fresher butter generally yields a cleaner flavor in the clarified product.
- Save the Solids: The browned milk solids, often called “butter crumble” or “bont” in some cuisines, are delicious and can be used in baking or as a topping for salads and vegetables.

Variations And Uses Of Clarified Butter
Clarified butter is a chameleon in the kitchen, adapting to various culinary roles. Its pure, rich flavor and high smoke point make it indispensable for certain cooking methods, while its stability opens doors for longer-term storage and use in diverse recipes.
Culinary Applications
The applications of clarified butter are vast and varied, spanning across different cuisines and cooking styles.
- High-Heat Searing and Frying: Its elevated smoke point makes it the ideal fat for searing steaks, pan-frying chicken or fish, and deep-frying. You can achieve a beautiful golden-brown crust without the worry of the fat burning.
- Sautéing Vegetables: For delicate vegetables like asparagus or mushrooms, clarified butter provides a rich flavor base without overpowering their natural taste.
- Baking: In baking, clarified butter can replace regular butter in many recipes, especially those requiring a higher oven temperature or where a distinct nutty flavor is desired. It can lend a unique texture and aroma to cookies, cakes, and pastries.
- Sauces and Finishing: A drizzle of clarified butter can enrich sauces, add a glossy finish to roasted vegetables, or be used to baste seafood.
- Dipping Sauce: Warm clarified butter, sometimes infused with herbs or garlic, is a classic accompaniment for seafood like lobster or crab.
Ghee Vs. Clarified Butter: A Nuance
While often used interchangeably, there’s a subtle difference between clarified butter and ghee, particularly in traditional Indian cuisine.
- Clarified Butter: Typically made by simmering butter until the water evaporates and the milk solids are removed. The process often stops once the liquid is clear.
- Ghee: Made by continuing the simmering process slightly longer, allowing the milk solids to lightly brown at the bottom of the pan before straining. This browning process imparts a distinct nutty, caramelized flavor and aroma that is characteristic of ghee. Ghee also tends to have an even longer shelf life due to the removal of more moisture and the slight toasting of solids.
Here’s a comparison:
| Feature | Regular Butter | Clarified Butter | Ghee |
|---|---|---|---|
| **Composition** | ~80-82% Butterfat, ~15-18% Water, ~1-2% Milk Solids | ~99-100% Butterfat, <1% Water, <1% Milk Solids (removed) | ~99-100% Butterfat, <0.5% Water, <0.5% Milk Solids (toasted) |
| **Smoke Point** | 300-350°F (150-175°C) | 450-485°F (230-250°C) | 485-500°F (250-260°C) |
| **Flavor** | Creamy, milky | Clean, pure butter flavor | Nutty, caramelized, slightly toasted |
| **Shelf Life** | Refrigerated: Months | Refrigerated: Up to a year; Room Temp: Weeks | Refrigerated: Over a year; Room Temp: Months |
| **Primary Use** | Spreading, baking, low-heat cooking | High-heat cooking, sautéing, baking | High-heat cooking, traditional Indian cuisine, baking |
| **Lactose/Casein** | Present | Virtually absent | Virtually absent |
Dairy Sensitivity Considerations
Because the lactose and casein are removed during the clarification process, clarified butter is often well-tolerated by individuals with mild dairy sensitivities or lactose intolerance. This makes it a valuable alternative for those who cannot consume regular butter or ghee. However, it’s important to note that for individuals with severe dairy allergies, even trace amounts of milk proteins might cause a reaction. If you have a severe allergy, it’s always best to consult with a healthcare professional.

Storing And Using Clarified Butter
Proper storage is crucial for maintaining the quality and extending the shelf life of your homemade clarified butter. Its purity means it’s less susceptible to spoilage than regular butter, but it still requires mindful handling.
Storage Guidelines
- Cooling: Allow the clarified butter to cool completely before transferring it to its storage container.
- Container: Use clean, airtight containers. Glass jars with tight-fitting lids are ideal.
- Refrigeration: For the longest shelf life, store clarified butter in the refrigerator. It will solidify into a hard, butter-like consistency. Properly stored this way, it can last for up to a year.
- Room Temperature: If you plan to use it frequently and have a cool kitchen environment (below 70°F or 21°C), clarified butter can be stored at room temperature for several weeks. However, refrigeration is always the safest bet for preserving quality.
- Freezing: For long-term storage beyond a year, clarified butter can be frozen. Ensure it’s in an airtight, freezer-safe container.
Shelf Life Expectations
The shelf life of clarified butter is significantly longer than that of regular butter due to the removal of water and milk solids, which are prone to spoilage.
- Regular Butter: Typically lasts for a few months in the refrigerator, but can go rancid faster if exposed to light and air.
- Clarified Butter (Refrigerated): Can last for up to one year.
- Clarified Butter (Room Temperature): Can last for several weeks to a couple of months, depending on ambient temperature and container airtightness.
- Ghee: Due to the toasted milk solids and further moisture removal, ghee often has an even longer shelf life, potentially lasting for a year or more at room temperature.
Testing For Spoilage
Even with proper storage, it’s wise to know how to detect spoilage. If your clarified butter develops an off odor, mold, or a rancid taste, it’s time to discard it. The pure fat content makes it less prone to spoilage than regular butter, but it’s not entirely immune.
Troubleshooting Common Clarification Issues
Even with simple processes, hiccups can occur. Understanding common issues and their solutions can help ensure a perfect batch of clarified butter every time.
Why Is My Clarified Butter Cloudy?
Cloudiness in clarified butter usually indicates that not all the water has evaporated or that milk solids have been stirred up during the straining process.
- Solution: Ensure you simmer the butter long enough for the water to fully evaporate. You’ll know the water is gone when the bubbling and foaming subside significantly, and the liquid becomes very clear. When straining, pour or ladle the liquid gently to avoid disturbing the settled solids. For exceptionally clear results, strain twice, perhaps with a fresh piece of cheesecloth the second time.
My Milk Solids Burned! What Did I Do Wrong?
Burning the milk solids is a common pitfall, especially for beginners. It typically happens when the heat is too high.
- Solution: Always use low heat. The process should be a gentle simmer, not a rolling boil. If you notice the solids at the bottom turning dark brown rapidly, immediately remove the pan from the heat. In the future, start with a colder pan and gradually increase the heat to low. If a small amount of solids scorches, you might still be able to salvage the clarified butter by carefully pouring off the clear liquid, but the flavor might be compromised.
The Clarified Butter Tastes Like Regular Butter
This usually means the process was stopped too soon, and a significant amount of water or milk solids remain.
- Solution: Continue simmering until the liquid appears very clear and the solids have settled distinctly at the bottom. If you’re aiming for ghee, continue until the solids are lightly golden brown and a nutty aroma is present. The difference in flavor and performance comes from the complete separation of fat from water and milk solids.
Is It Okay If Some Milk Solids Get Through The Strainer?
A few tiny specks of milk solids are generally not a major issue, especially if you plan to use the clarified butter for high-heat cooking where they won’t burn. However, for aesthetic reasons and maximum shelf life, it’s best to remove as much as possible.
- Solution: Use a fine-mesh sieve lined with cheesecloth or a coffee filter for straining. For an even cleaner product, strain the butter twice. Allowing the butter to cool slightly before straining can also help the solids settle more firmly at the bottom of the pan.
Real-world Examples: Clarified Butter In Action
The versatility of clarified butter shines through in its diverse applications across professional kitchens and home cooking alike. From classic French cuisine to vibrant Indian dishes, it plays a crucial role.
Example 1: Searing Scallops To Perfection
A prime example of clarified butter’s utility is in searing delicate scallops. When scallops are placed in a searing-hot pan, they need a fat that can withstand high temperatures to develop a beautiful, golden-brown crust without burning. Regular butter would quickly scorch, imparting a bitter taste and potentially ruining the dish.
Using clarified butter allows the chef to achieve that perfect sear, locking in the scallop’s juices and creating a delightful textural contrast. The pure butterfat ensures an even, high-heat transfer, crucial for cooking these tender morsels quickly and efficiently. This technique is common in high-end restaurants where presentation and flavor are paramount.
Example 2: Traditional Indian Cooking (ghee)
In Indian cuisine, ghee is not just a cooking fat; it’s an integral part of the culinary heritage. It’s used extensively in preparing everything from rich curries and fragrant biryanis to sweet desserts like ladoos. The nutty, slightly toasted flavor of ghee adds a unique depth and aroma that is characteristic of authentic Indian dishes. For instance, when making Dal Makhani, ghee is often used both in the initial tempering of spices and as a finishing drizzle, adding a luxurious richness and aroma that is irreplaceable. Many Indian households make ghee in large batches, recognizing its long shelf life and superior cooking properties.
Example 3: Baking Delicate Pastries
For bakers, clarified butter can be a secret weapon. In recipes for flaky croissants or delicate puff pastry, the precise temperature control during baking is vital. Clarified butter’s high smoke point allows for higher baking temperatures, which helps create those signature airy layers and crisp textures. It can also be used in recipes where a pure, concentrated butter flavor is desired without the water content that might affect the texture of certain baked goods, such as shortbread cookies or financiers. When I tested a recipe for financiers using clarified butter versus regular butter, the clarified version had a slightly crisper edge and a more pronounced nutty flavor, a welcome enhancement.
Frequently Asked Questions
What Is The Difference Between Clarified Butter And Ghee?
While both are made by removing water and milk solids from butter, ghee is simmered longer to lightly brown the milk solids, giving it a distinct nutty flavor and aroma. Clarified butter is typically stopped once the liquid is clear, retaining a purer butter flavor and slightly less intense nuttiness.
Ghee also has a slightly higher smoke point and longer shelf life due to the toasting of solids and further moisture removal.
Can I Use Oil Instead Of Clarified Butter In Recipes?
You can substitute oils for clarified butter, but the flavor profile will change significantly. For high-heat cooking where flavor is less critical, neutral oils like vegetable or canola oil can work. However, if the recipe relies on the rich, buttery flavor, no other oil can truly replicate it.
Olive oil, for instance, has a distinct flavor that might not complement all dishes.
How Long Does Clarified Butter Last?
When stored properly in an airtight container in the refrigerator, clarified butter can last for up to one year. At room temperature, in a cool, dark place, it can last for several weeks to a couple of months. Ghee, due to its more thorough processing, often has an even longer shelf life, potentially over a year at room temperature.
Do I Need To Use Special Equipment To Make Clarified Butter?
No, you don’t need specialized equipment. A simple heavy-bottomed saucepan, a spoon for skimming, and a heatproof bowl or jar for storage are all you really need. For straining, a fine-mesh sieve lined with cheesecloth or a coffee filter is recommended for optimal clarity, but a very fine sieve can also work.
Is Clarified Butter Healthier Than Regular Butter?
Clarified butter is essentially pure butterfat, meaning it contains virtually no lactose or casein. This makes it a suitable alternative for individuals with lactose intolerance or mild dairy sensitivities. From a fat perspective, it’s still a saturated fat, and moderation is key.
Its primary advantage is its higher smoke point and longer shelf life, not necessarily a significant health benefit over regular butter for those who tolerate dairy well.
The journey from a simple block of butter to the golden, stable fat known as clarified butter is a testament to the power of heat and patience. This culinary alchemical process unlocks a world of possibilities in the kitchen, offering enhanced flavor, superior cooking performance, and greater versatility.
Whether you’re searing a steak, baking delicate pastries, or exploring the rich traditions of global cuisine, mastering the art of making clarified butter is a skill that will undoubtedly elevate your cooking. Its long shelf life and suitability for those with dairy sensitivities further cement its status as an indispensable pantry staple.
Leave a Reply