
Mastering the Art of the Boiled Egg: From Soft-Boiled Perfection to Hard-Boiled Brilliance
The humble boiled egg is a culinary cornerstone, a versatile ingredient that graces breakfast tables, lunchboxes, and appetizer platters worldwide. Its simplicity belies a nuanced cooking process, where timing and technique dictate the difference between a perfectly set yolk and a rubbery disappointment.
Whether you crave a runny, molten center for dipping toast or a firm, sliceable disc for salads, understanding the fundamentals of boiling an egg is an essential skill for any home cook. This guide will demystify the process, offering insights into achieving your desired doneness, exploring different methods, and providing tips to ensure consistently delicious results every time.
Key Takeaways
- Precision is Paramount: Even slight variations in cooking time can significantly alter the yolk’s consistency.
- Cold Water Start vs. Boiling Water Start: Both methods have pros and cons; the cold water start is generally more forgiving and less prone to cracking.
- Egg Freshness Matters: Fresher eggs are harder to peel, while older eggs tend to peel more easily.
- Ice Bath is Crucial: Rapidly cooling boiled eggs stops the cooking process and makes them easier to peel.
- Altitude Adjustments: Higher altitudes require slightly longer cooking times due to lower atmospheric pressure.
- Storage Guidelines: Boiled eggs can be stored in the refrigerator for up to a week, unpeeled.

Understanding Egg Science: The Key To Perfect Results
Before diving into the practicalities of boiling, a basic understanding of what happens inside an egg during cooking is beneficial. An egg is composed primarily of water, proteins, and fats. When heated, these proteins undergo a process called denaturation, where their complex structures unfold and then re-form, creating a solid network. This is what transforms a liquid egg into a cooked egg.
The yolk, richer in fats and containing different types of proteins, cooks at a slightly different rate than the egg white. The vitelline membrane, which surrounds the yolk, is relatively delicate. Overcooking can cause the proteins in the yolk to become tough and can even lead to the formation of a greenish-grey ring around the yolk, primarily due to a reaction between sulfur in the egg white and iron in the yolk. Mastering boiled eggs involves finding that sweet spot where the white is firm but tender, and the yolk is cooked to your exact preference.
The Role Of Egg Freshness
The freshness of your eggs plays a surprisingly significant role in the boiling process, particularly when it comes to peeling. Freshly laid eggs have a more acidic white. As an egg ages, carbon dioxide escapes, and the pH of the white increases. This change makes the bond between the egg white and the inner shell membrane weaker. Consequently, older eggs (typically a week or more old) are generally much easier to peel after boiling than very fresh eggs. If you’re planning to boil eggs for a specific event and need them to peel easily, it’s often best to buy them a week in advance.
Temperature And Altitude Considerations
The temperature of the water and the altitude at which you are cooking can influence cooking times. At higher altitudes, atmospheric pressure is lower, meaning water boils at a cooler temperature. This requires slightly longer cooking times to achieve the same level of doneness. For every 3,000 feet above sea level, you may need to add approximately one minute to your boiling time. For example, if a recipe calls for 10 minutes at sea level, you might need 11-12 minutes at 6,000 feet.
The Classic Cold Water Start Method
The cold water start method is arguably the most common and forgiving way to boil eggs. It involves placing the eggs in a pot, covering them with cold water, and then bringing the water to a boil.
Step-by-step Guide
- Select Your Pot: Choose a saucepan large enough to hold the eggs in a single layer without overcrowding. Overcrowding can lead to uneven cooking.
- Place Eggs Gently: Carefully place your eggs in the bottom of the saucepan. Avoid dropping them, as this can cause cracks.
- Cover with Cold Water: Add cold tap water to the pot, ensuring the eggs are covered by at least one inch of water. This provides a buffer and helps prevent cracking.
- Add Salt or Vinegar (Optional): Some cooks add a teaspoon of salt or a splash of white vinegar to the water. The theory is that this helps to seal any small cracks that might form, preventing the egg white from leaking out. While debated, it’s a common practice.
- Bring to a Rolling Boil: Place the saucepan over high heat and bring the water to a full, rolling boil.
- Reduce Heat and Simmer: Once the water reaches a rolling boil, immediately reduce the heat to a gentle simmer. Cover the pot with a lid.
- Time Your Eggs: This is the crucial step. Start your timer based on your desired doneness:
- Soft-Boiled (Runny Yolk, Just-Set White): 3-5 minutes
- Medium-Boiled (Jammy/Custardy Yolk, Firm White): 6-8 minutes
- Hard-Boiled (Fully Cooked, Firm Yolk): 9-12 minutes
- Prepare an Ice Bath: While the eggs are simmering, fill a bowl with cold water and plenty of ice cubes.
- Transfer Eggs to Ice Bath: Once the timer goes off, immediately use a slotted spoon to carefully transfer the eggs from the simmering water into the ice bath.
- Cool Completely: Let the eggs sit in the ice bath for at least 10-15 minutes. This stops the cooking process instantly, preventing overcooking and making them easier to peel.
Pros And Cons Of The Cold Water Start
Pros:
- Less Prone to Cracking: The gradual heating process is gentler on the eggshells.
- More Forgiving: Small variations in timing are less likely to result in drastically different textures.
- Easier to Peel (Generally): When combined with the ice bath, this method often yields eggs that are easier to peel, especially if they aren’t extremely fresh.
Cons:
- Less Precise Timing: It can be slightly harder to pinpoint the exact moment of desired doneness compared to the boiling water start, as the initial heating time is variable.
- Requires More Attention: You need to be present to reduce the heat once the water boils.
The Boiling Water Start Method
This method involves adding eggs directly to already boiling water. It offers more precise control over cooking time but carries a higher risk of cracking.
Step-by-step Guide
- Boil Water: Fill a saucepan with enough water to cover the eggs by at least an inch. Bring the water to a full, rolling boil over high heat.
- Prepare Ice Bath: While the water heats, prepare a bowl with ice and cold water.
- Add Eggs Carefully: Using a slotted spoon, gently lower the eggs one by one into the boiling water. Be very careful to avoid splashing or dropping them, as this is where most cracking occurs. You can also lower the heat slightly just before adding the eggs to reduce the intensity of the boil.
- Maintain a Simmer: Once all eggs are in the pot, adjust the heat to maintain a gentle simmer. Do not let the water boil vigorously, as this can cause the eggs to bounce around and crack.
- Time Your Eggs: Start your timer immediately after adding the eggs. Use the same timing guidelines as the cold water start method:
- Soft-Boiled: 3-5 minutes
- Medium-Boiled: 6-8 minutes
- Hard-Boiled: 9-12 minutes
- Transfer to Ice Bath: When the timer rings, use a slotted spoon to quickly remove the eggs from the boiling water and plunge them into the prepared ice bath.
- Cool Completely: Allow the eggs to cool in the ice bath for at least 10-15 minutes to halt the cooking process and facilitate peeling.
Pros And Cons Of The Boiling Water Start
Pros:
- Precise Timing: Cooking time begins the moment the eggs hit the water, offering greater control.
- Potentially Easier Peeling: Some find this method leads to easier peeling, especially with very fresh eggs, although the ice bath is still key.
Cons:
- Higher Risk of Cracking: The thermal shock of dropping room-temperature eggs into boiling water can cause shells to crack.
- More Delicate Handling Required: Requires a steady hand and careful execution when adding eggs to the pot.
:max_bytes(150000):strip_icc()/soft-boiled-eggs-for-ramen-Hero-bf6857e86b0b4b5eab36f7f573d7ce8c.jpg)
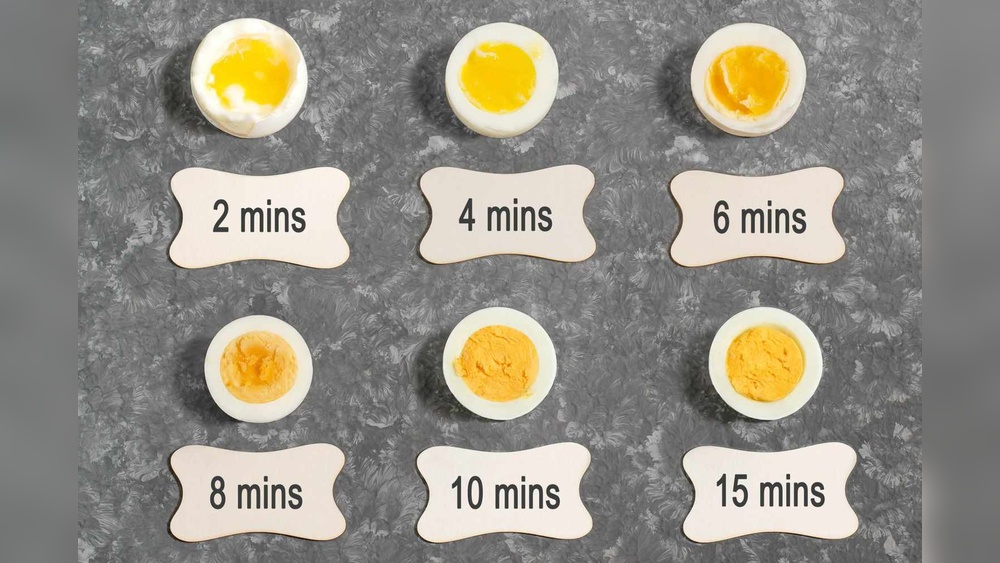
Achieving Your Desired Egg Doneness: A Visual Guide
The terms “soft,” “medium,” and “hard” boiled can be subjective. Here’s a more detailed breakdown of what to expect for each, based on the recommended timings (assuming medium-sized eggs, cold water start, simmered for the specified time, and immediately placed in an ice bath):
| Doneness | Cooking Time (Simmering) | Yolk Consistency | White Consistency | Best Uses |
|---|---|---|---|---|
| **Soft** | 3-5 minutes | Completely liquid, warm | Just set around the edges, tender and delicate | Dipping toast soldiers, topping ramen, as a simple breakfast |
| **Medium** | 6-8 minutes | Jammy, custardy, partially set, warm and rich | Firm but still tender, fully cooked | Avocado toast, egg salad sandwiches, Cobb salads, deviled eggs (partially) |
| **Hard** | 9-12 minutes | Firm, fully cooked, crumbly, bright yellow | Firm and fully cooked, slightly more rubbery | Egg salad, garnishes, deviled eggs, lunchboxes, potato salads, picnics |
Pro Tip: For consistently perfect hard-boiled eggs, aim for around 10-11 minutes. This usually results in a fully cooked, firm yolk without the dreaded grey-green ring.
The Steaming Method: An Alternative Approach
Steaming eggs is a less common but highly effective method that offers a good balance between ease of use and consistent results, often leading to easier peeling. It works by using steam to cook the eggs rather than direct immersion in water.
Step-by-step Guide
- Prepare the Steamer: Place a steamer basket or insert into a pot. Add about an inch of water to the pot, ensuring the water level is below the bottom of the steamer basket.
- Bring Water to Boil: Cover the pot and bring the water to a boil over high heat.
- Add Eggs: Once the water is boiling and steam is actively rising, carefully place the eggs in a single layer in the steamer basket.
- Cover and Steam: Immediately cover the pot tightly with the lid. Reduce the heat to maintain a steady stream of steam, but avoid a violent boil that could jostle the eggs.
- Time Your Eggs: Steam the eggs for the following durations:
- Soft-Boiled: 6-7 minutes
- Medium-Boiled: 9-10 minutes
- Hard-Boiled: 12-14 minutes
- Transfer to Ice Bath: As soon as the steaming time is up, use a slotted spoon to transfer the eggs to a prepared ice bath.
- Cool Completely: Let them cool in the ice bath for at least 10-15 minutes.
Pros And Cons Of Steaming
Pros:
- Consistent Results: Steam provides even heat distribution.
- Easier Peeling: Many cooks report that steamed eggs are significantly easier to peel, possibly due to the way the steam cooks the membrane.
- Less Water Usage: Requires less water than boiling.
Cons:
- Requires Steamer Basket: You need specific equipment.
- Slightly Longer Cooking Times: Generally takes a minute or two longer than boiling for similar results.
Peeling Your Boiled Eggs: Tips For Success
Peeling boiled eggs can be a frustrating experience, leading to torn whites and sticky shells. Here are some techniques that improve your chances of success:
- The Ice Bath is Non-Negotiable: As mentioned repeatedly, this is the single most important step for easy peeling. The rapid cooling causes the egg white to contract slightly, pulling away from the shell membrane.
- Gently Crack the Shell: Once cooled, gently tap the egg on a hard surface (like a countertop) all around its circumference to create fine cracks. Then, roll the egg gently between your palms to further loosen the shell.
- Start Peeling Under Running Water: Hold the egg under a gentle stream of cool running water. The water can seep between the shell and the membrane, helping to lift them away. Start peeling from the wider end of the egg, where the air pocket usually resides.
- Use a Spoon: If the shell is particularly stubborn, try sliding a small spoon (like a teaspoon) between the shell and the membrane, working your way around the egg.
- Consider Older Eggs: As noted earlier, eggs that are a week or older are significantly easier to peel. If you’re boiling eggs specifically for peeling, plan ahead.
Example: When I prepared deviled eggs for a party last month, I used eggs that were two weeks old and made sure to immediately plunge them into an ice bath. Nearly every egg peeled perfectly in under 30 seconds each, leaving a smooth, unblemished white.
Troubleshooting Common Boiled Egg Problems
Even with the best intentions, things can go wrong. Here are solutions to common issues:
Problem: Cracked Eggs
- Cause: Thermal shock (eggs too cold when added to boiling water), overcrowding the pot, vigorous boiling, or using very fresh eggs.
- Solution: Use the cold water start method, ensure eggs are at room temperature (though this can slightly affect timing), don’t overcrowd the pot, maintain a gentle simmer, and consider using slightly older eggs. If a crack occurs, the salt/vinegar trick might help minimize leakage.
Problem: Rubbery Whites Or Overcooked Yolk
- Cause: Overcooking.
- Solution: Be precise with your timing. Use a timer and the ice bath method diligently. If you consistently find your whites are rubbery, try reducing the simmering time by 30 seconds to a minute.
Problem: Greenish-grey Ring Around The Yolk
- Cause: Overcooking, which causes a reaction between sulfur in the white and iron in the yolk.
- Solution: Reduce cooking time. Ensure you are using the ice bath immediately after cooking to stop the cooking process. Aim for the lower end of the hard-boiled timing (around 9-10 minutes).
Problem: Difficulty Peeling
- Cause: Eggs are too fresh, insufficient cooling in the ice bath, or improper peeling technique.
- Solution: Use older eggs, ensure a thorough ice bath (at least 10-15 minutes), and use the cracking and running water techniques described above.
Storing Boiled Eggs
Proper storage is key to food safety and maintaining quality.
- Unpeeled: Cooled, hard-boiled eggs can be stored in their shells in the refrigerator for up to one week. Keep them in a carton or a covered container to prevent them from absorbing odors.
- Peeled: Peeled hard-boiled eggs should also be refrigerated in an airtight container and are best consumed within 2-3 days. They tend to dry out more quickly once peeled.
- Soft/Medium-Boiled: Due to their less firm yolks, soft and medium-boiled eggs are not ideal for long-term storage and are best consumed shortly after cooking.
Beyond The Basics: Variations And Uses
Once you’ve mastered the basic boiled egg, you can explore various culinary applications:
- Deviled Eggs: A classic appetizer where hard-boiled egg yolks are mixed with mayonnaise, mustard, and seasonings, then piped back into the egg white halves.
- Egg Salad: Chopped hard-boiled eggs mixed with mayonnaise, celery, onion, and seasonings, perfect for sandwiches.
- Salad Toppings: Sliced or quartered hard-boiled eggs add protein and richness to green salads, such as a Cobb salad or Niçoise salad.
- Curried Eggs: Whole hard-boiled eggs simmered in a flavorful curry sauce.
- Scotch Eggs: A savory snack consisting of a hard-boiled egg wrapped in sausage meat, coated in breadcrumbs, and deep-fried or baked.
The versatility of the boiled egg extends to breakfast dishes, where soft-boiled eggs can be served in egg cups with toast soldiers, or added to avocado toast. For those who appreciate kitchen gadgets, exploring advanced appliances like high-performance blenders could be interesting. For instance, comparing the Ninja Foodi vs Wantjoin Professional Blender or understanding the differences between models like the Ninja BN751 vs DB751A Pro Plus Duo Blender showcases the diverse range of kitchen technology available, though none are directly related to boiling eggs themselves.
Frequently Asked Questions
How Many Minutes Should I Boil An Egg For A Jammy Yolk?
For a jammy, custardy yolk (often referred to as medium-boiled), aim for approximately 6 to 8 minutes of simmering time after the water has reached a boil, using the cold water start method. Always follow this with an immediate ice bath to stop the cooking process.
Can I Boil Eggs In Advance?
Yes, you can boil eggs in advance. Hard-boiled eggs, stored unpeeled in their shells, can be kept in the refrigerator for up to one week. It’s best to cool them completely in an ice bath before refrigerating. Avoid storing peeled boiled eggs for more than 2-3 days as they dry out.
Why Do My Boiled Eggs Crack?
Eggs typically crack due to thermal shock when added to very hot water, or if the water is boiling too vigorously. Using the cold water start method, ensuring eggs are not overcrowded, and maintaining a gentle simmer rather than a rolling boil can significantly reduce cracking. Very fresh eggs are also more prone to cracking.
What Is The Best Method For Peeling Boiled Eggs?
The most effective method for peeling boiled eggs involves a combination of techniques: immediately cooling the eggs in an ice bath for at least 10-15 minutes, gently cracking the shell all over, and then peeling under cool running water, starting from the wider end. Using slightly older eggs (a week or more) also greatly aids in easy peeling.
Does Adding Vinegar Or Salt To The Boiling Water Actually Help?
Adding a teaspoon of salt or a splash of vinegar to the water is a common practice believed to help seal small cracks that may form during cooking, preventing the egg white from leaking out excessively. While its effectiveness is debated among cooks, it’s a low-risk addition that might offer some benefit if an egg does crack.
Mastering the art of the boiled egg is a rewarding culinary achievement. By understanding the science behind it, choosing the right method, paying close attention to timing, and employing the crucial ice bath technique, you can consistently produce perfectly cooked eggs tailored to your preferences.
Whether destined for a simple breakfast or a complex dish, the humble boiled egg remains a testament to the beauty of simple, well-executed cooking.
Leave a Reply