
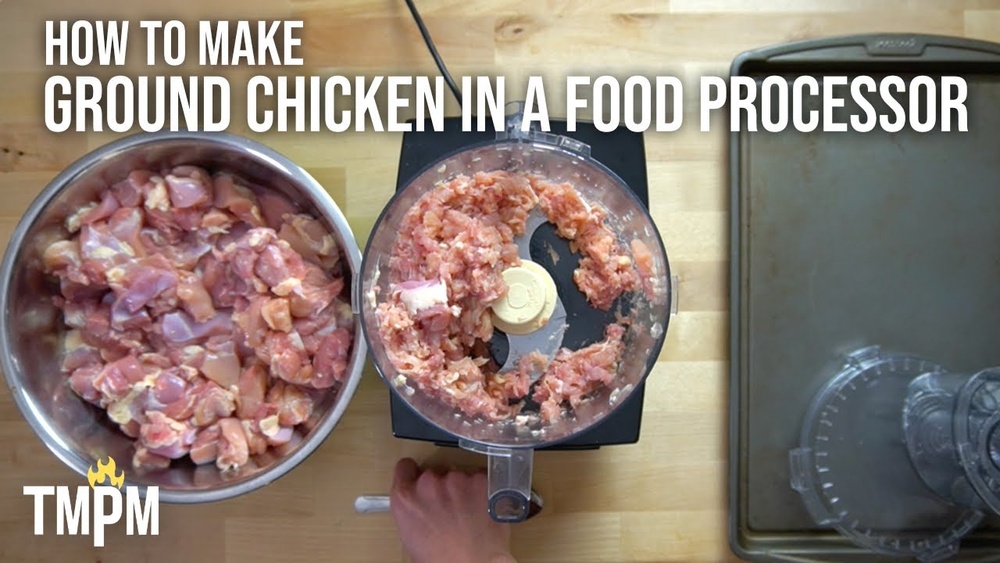
Making your own ground chicken at home using a food processor is a surprisingly simple and cost-effective way to control the quality and texture of this versatile ingredient. Whether you’re aiming for a finer grind for delicate meatballs or a slightly coarser texture for burgers, a food processor offers unparalleled flexibility. This method not only saves you money compared to pre-ground options but also eliminates any potential additives or preservatives often found in store-bought versions. Furthermore, it allows you to utilize specific cuts of chicken, ensuring you get the fat-to-lean ratio you desire, which is crucial for flavor and moisture.
The convenience of having freshly ground chicken ready at a moment’s notice can transform weeknight meals. Imagine whipping up a batch of healthy chicken tacos, flavorful chicken sausage, or even homemade chicken patties in a fraction of the time it would take to visit the grocery store.
This guide will walk you through the entire process, from selecting the right chicken cuts to achieving the perfect consistency in your food processor, along with tips for storage and creative recipe ideas.
Key Takeaways
- A food processor is an efficient tool for grinding chicken at home, offering control over texture and ingredients.
- Choosing the right chicken cuts, balancing lean meat with fat, is crucial for flavor and moisture.
- Properly chilling the chicken and equipment before processing ensures a better grind and food safety.
- Pulse the food processor in short bursts to avoid over-processing and creating a paste.
- Clean your food processor thoroughly immediately after use to maintain hygiene and prevent odor transfer.
- Ground chicken can be stored in the refrigerator for 1-2 days or frozen for up to 3-4 months.

Why Grind Your Own Chicken?
The decision to grind your own chicken at home, particularly with a food processor, stems from several compelling advantages that cater to both culinary enthusiasts and budget-conscious home cooks. It’s about regaining control over your food and enhancing the overall cooking experience.
Superior Quality And Freshness
When you grind chicken yourself, you are guaranteed the freshest possible product. Supermarket ground chicken, while convenient, often sits in refrigerated display cases for extended periods, potentially compromising its quality and taste. By grinding just before cooking, you ensure that your chicken is at its peak, leading to more vibrant flavors and a better final dish. You also have the absolute certainty of knowing exactly what’s in your ground chicken, no fillers, no preservatives, and no mystery additives. This is particularly important for individuals with dietary restrictions or allergies.
Cost Savings
Purchasing whole chicken pieces or boneless, skinless thighs and breasts and grinding them yourself can be significantly more economical than buying pre-ground chicken. The price difference per pound can add up quickly, especially for families or individuals who frequently incorporate ground chicken into their meals. This cost-effectiveness allows you to allocate your food budget to other premium ingredients or simply enjoy savings. For instance, chicken thighs are often cheaper than breasts, and grinding them yourself allows you to use this more affordable cut while still achieving excellent results.
Customization And Control
One of the most significant benefits is the ability to customize the grind consistency and fat content. Do you prefer a very fine grind for delicate chicken meatballs that melt in your mouth, or a slightly coarser texture for hearty chicken burgers that hold their shape? A food processor allows you to achieve this with precision. You can also control the fat ratio. For leaner dishes, you might opt for mostly chicken breast, while for richer, more flavorful recipes, incorporating chicken thighs (which have more natural fat) is ideal. This level of control is impossible with commercially ground chicken, where the fat content is typically fixed.
Versatility In Usage
Having freshly ground chicken on hand opens up a world of culinary possibilities. It’s perfect for:
- Meatballs and Meatloaf: Achieve the desired texture for tender, flavorful meatballs or a moist meatloaf.
- Burgers and Sliders: Create custom chicken burgers with your favorite seasonings mixed in.
- Sausage Making: Form homemade chicken sausage for breakfast or dinner.
- Fillings: Use for dumplings, stuffed peppers, or savory pies.
- Patties and Nuggets: Make healthier, homemade versions of chicken patties or nuggets for kids.

Selecting The Right Chicken Cuts
The foundation of great-tasting, well-textured ground chicken lies in the selection of the raw chicken. While you can technically grind any part of the chicken, certain cuts yield superior results in terms of flavor, moisture, and texture when processed in a food processor. Understanding the role of fat is key here; it’s not the enemy, but rather a crucial component for deliciousness and preventing dryness.
The Role Of Fat
Fat is essential for flavor and moisture in ground chicken. Leaner cuts like chicken breast can become dry and crumbly if ground alone, especially if overcooked. Fattier cuts, such as chicken thighs, provide more richness and help keep the ground chicken moist during cooking. A balanced approach is often best. For most recipes, a mix of chicken breast and thigh is ideal, creating a ground chicken that is both flavorful and tender.
Recommended Cuts
- Chicken Thighs: These are an excellent choice due to their higher fat content. They provide great flavor and moisture, making them perfect for burgers, meatballs, and sausages. Boneless, skinless thighs are the easiest to work with.
- Chicken Breasts: While leaner, chicken breasts contribute to a lighter color and a less dense texture. When combined with thighs, they help to balance the fat content and prevent the final product from being too greasy.
- Whole Chicken: For the ultimate control and potential cost savings, you can debone a whole chicken and use both the breast and thigh meat. This allows you to precisely control the ratio of dark to white meat.
Achieving The Ideal Fat-to-lean Ratio
The ideal fat-to-lean ratio for ground chicken is generally considered to be around 80% lean and 20% fat. This ratio provides a good balance of flavor, moisture, and texture without being overly greasy.
- For very lean ground chicken: Use primarily chicken breast, perhaps with a small amount of thigh meat for a touch of moisture. Be mindful that this will be drier and may require added binders or moisture during cooking.
- For richer, more flavorful ground chicken: Increase the proportion of chicken thighs. This is excellent for dishes where a robust flavor is desired, like sausages or hearty burgers.
When purchasing chicken, look for fresh, high-quality meat. If you’re grinding a lot, buying larger packs of thighs or breasts can often be more economical.

Preparing The Chicken For Grinding
Proper preparation is paramount for achieving a safe and well-textured ground chicken using your food processor. This involves not only cleaning the chicken but also ensuring it’s at the right temperature to facilitate a clean grind and prevent bacterial growth.
Trimming Excess Fat And Removing Bones/skin
Before you begin, ensure your chicken is boneless and skinless, unless you specifically intend to include the skin for added fat and flavor. Remove any large, hard pieces of fat that you don’t want in your ground mixture. However, a moderate amount of the natural fat attached to the meat should be kept, as it contributes to moisture and flavor. If you are using chicken thighs, trim off any excess tough connective tissue or silverskin.
Chilling The Chicken: The Crucial Step
This is perhaps the most critical step for successful food processor grinding. The chicken needs to be very cold, bordering on frozen.
- Initial Chill: Place your trimmed chicken pieces in the freezer for about 20-30 minutes. You want the meat to be firm and cold, but not completely frozen solid. It should be stiff enough that it doesn’t easily bend.
- Why Cold is Key: Cold meat is firmer and cuts more cleanly. Warm or room-temperature meat will tend to smear and clump together in the food processor, resulting in a mushy, paste-like texture rather than a desirable ground consistency. Cold meat also significantly reduces the risk of bacterial proliferation, which is vital for food safety.
Chilling The Food Processor Bowl And Blade
For optimal results, it’s also beneficial to chill your food processor bowl and blade in the freezer for about 15-20 minutes before you begin. This further ensures that the chicken remains as cold as possible throughout the grinding process, contributing to a better texture and enhancing food safety.
Cutting The Chicken Into Uniform Pieces
Once the chicken is sufficiently chilled, cut it into uniform, roughly 1-inch cubes. This ensures that the food processor can process the meat evenly. Overly large or uneven pieces will lead to inconsistent grinding.
The Grinding Process With A Food Processor
Using a food processor to grind chicken is straightforward, but it requires attention to detail, particularly regarding pulsing technique, to achieve the desired texture without over-processing.
Setting Up Your Food Processor
Ensure your food processor is clean and dry. Assemble the bowl and the S-blade attachment. Place the chilled chicken cubes into the food processor bowl. Do not overfill the bowl; it’s better to work in smaller batches. Overfilling will prevent even grinding and can strain the motor. Typically, you should fill the bowl no more than halfway with the chicken pieces.
The Pulsing Technique
This is where the magic happens. The key to achieving a good grind is to use the pulse function rather than running the processor continuously.
- Start Pulsing: Secure the lid and begin pulsing the chicken in short, controlled bursts, usually 5-10 pulses at a time.
- Check Consistency: After each set of pulses, remove the lid and check the texture of the chicken. Scrape down the sides of the bowl with a spatula to ensure all pieces are being processed evenly.
- Continue Pulsing: Repeat the pulsing process, checking the consistency after every few pulses. You are looking for a texture that resembles commercially ground chicken. It should be broken down into small pieces but not form a smooth paste. The exact number of pulses will vary depending on your food processor’s power and the size of the chicken cubes, but it typically takes anywhere from 15 to 30 short pulses.
- Avoid Over-Processing: Stop immediately once you reach your desired consistency. Over-processing will result in a mushy, pasty texture that is undesirable for most recipes and can lead to tough cooked chicken. If you see the meat starting to clump together into a sticky mass, you’ve gone too far.
Working In Batches
If you are grinding a larger quantity of chicken, it is essential to work in batches. Do not try to grind more than about 1.5 to 2 pounds of chicken at a time in a standard-sized food processor (around 7-14 cup capacity). Processing in smaller batches ensures that the chicken remains cold and is ground evenly, leading to a superior final product. Allow the food processor motor to rest between batches, especially if you are grinding a large amount, to prevent overheating.
Example: Grinding Chicken For Burgers
When I’m making chicken burgers, I aim for a slightly coarser grind than I might for meatballs. After chilling chicken thighs and breasts (a 50/50 mix) and cutting them into cubes, I’ll pulse them in my food processor. I usually start with 5-second pulses, checking after each one.
I’ll scrape down the sides and give it another 3-5 pulses. I’m looking for distinct small pieces of meat, not a uniform paste. It usually takes about 3-4 rounds of pulsing and checking to get it just right. This method ensures the burgers have a good texture and don’t become dense or rubbery.
Cleaning And Storing Your Ground Chicken
Proper cleaning of your equipment and safe storage of your freshly ground chicken are vital for maintaining food safety and the quality of your homemade ingredient.
Cleaning The Food Processor
Immediate cleaning is crucial. Food particles, especially raw meat, can dry and become difficult to remove, and can also harbor bacteria.
- Disassemble: Carefully disassemble the food processor, removing the blade and bowl.
- Rinse: Rinse all parts thoroughly under cold running water to remove loose meat particles.
- Wash: Wash the bowl, lid, and blade with hot, soapy water. Use a brush to clean around the blade assembly carefully, as the blades are very sharp.
- Sanitize: For added safety, you can sanitize the parts by running them through a dishwasher (if they are dishwasher-safe) or by soaking them in a solution of 1 tablespoon of bleach per gallon of water for a few minutes, followed by a thorough rinse.
- Dry: Ensure all parts are completely dry before reassembling or storing them.
Storing Freshly Ground Chicken
- Refrigeration: Freshly ground chicken should be stored in an airtight container or a resealable plastic bag in the refrigerator. It is best used within 1 to 2 days of grinding. Because you’ve handled the raw chicken, maintaining proper refrigerator temperature is key.
- Freezing: For longer storage, freeze the ground chicken. Portion it into desired amounts (e.g., 1-pound or 0.5-pound packages) and wrap it tightly in plastic wrap, then place it in a freezer-safe bag or container. Properly stored, ground chicken can last in the freezer for 3 to 4 months. Label the packages with the date of grinding.
Thawing Frozen Ground Chicken
When you need to use frozen ground chicken, thaw it safely in the refrigerator overnight. Avoid thawing at room temperature, as this can allow bacteria to multiply rapidly. For quicker thawing, you can place the sealed package in a bowl of cold water, changing the water every 30 minutes.
Once thawed, use it immediately.
Recipes And Creative Uses For Homemade Ground Chicken
Having a supply of freshly ground chicken at your fingertips unlocks a multitude of culinary possibilities. Its versatility shines in dishes where texture and flavor are paramount. Unlike pre-packaged ground chicken, you have the advantage of tailoring the grind and seasoning precisely to your liking.
Healthy Chicken Burgers And Sliders
Forget dry, bland chicken burgers. Homemade ground chicken, especially when using a mix of thigh and breast, provides a moist and flavorful base.
- Pro Tip: Mix in finely minced onion, garlic, herbs (like parsley or cilantro), a touch of Dijon mustard, and perhaps a tablespoon of Worcestershire sauce for added depth. For binders, a little breadcrumb or an egg yolk works wonders. Don’t overwork the mixture; gently combine the ingredients.
Flavorful Meatballs And Meatloaf
Achieving the perfect texture for meatballs is where homemade ground chicken truly excels. You can create incredibly tender and juicy meatballs that hold their shape beautifully.
- For Meatballs: Combine ground chicken with finely chopped onion, garlic, herbs, breadcrumbs soaked in milk (for moisture), and an egg. Season generously with salt, pepper, and your favorite spices like paprika or Italian seasoning. Roll gently into balls and bake or pan-fry.
- For Meatloaf: Use a similar mixture, adding ingredients like ketchup or tomato paste for a glaze. The controlled fat content from using thighs ensures a moist meatloaf that won’t crumble.
Homemade Chicken Sausage
Making your own chicken sausage is surprisingly simple and allows you to control the spices and fat content entirely.
- Basic Recipe: Combine ground chicken (preferably with a good amount of thigh meat for fat) with salt, pepper, fennel seeds, red pepper flakes, and a pinch of sugar. You can also add sage, thyme, or other herbs. Mix gently, form into links, or use as a loose sausage for scrambles or pasta dishes. The ability to get a consistent grind means your sausage will have a pleasing texture.
Stuffed Vegetables And Appetizers
Ground chicken is an excellent filling for various dishes.
- Stuffed Bell Peppers: Mix ground chicken with cooked rice or quinoa, diced vegetables (like zucchini or mushrooms), herbs, and a flavorful sauce. Stuff into bell pepper halves and bake until tender.
- Chicken Wontons or Dumplings: A finely ground chicken mixture, seasoned with ginger, garlic, soy sauce, and sesame oil, makes a delicious filling for homemade wontons or dumplings. The precise grind ensures a smooth filling.
Chicken Patties And Nuggets
For a healthier alternative to store-bought versions, homemade chicken patties and nuggets are ideal.
- Patties: Mix ground chicken with finely minced vegetables, herbs, and a binder. Form into patties and pan-fry, bake, or grill.
- Nuggets: Form small pieces, dip in egg wash and breadcrumbs or panko, and bake until golden and cooked through.
The ability to control the texture means you can make these as delicate or as hearty as you desire. For instance, a slightly coarser grind might be preferred for chicken burgers to give them more bite, while a finer grind would be better for delicate wonton fillings.
This level of customization is what makes grinding your own chicken so rewarding.
Comparison: Food Processor Vs. Other Grinding Methods
While a food processor is a highly effective tool for grinding chicken at home, it’s useful to understand how it stacks up against other methods. Each has its own advantages and disadvantages, influencing the texture, effort, and cost involved.
Food Processor
- Pros: Widely available in most kitchens, relatively easy to use, offers good control over texture through pulsing, can handle moderate quantities.
- Cons: Can over-process chicken into a paste if not careful, requires chilling the meat thoroughly for best results, motor can overheat with very large batches.
- Best for: Home cooks who already own a food processor and want a convenient way to grind chicken with good texture control for everyday meals.
Meat Grinder (electric Or Manual)
- Pros: Specifically designed for grinding meat, produces a consistent grind, typically offers multiple plate sizes for different textures, can handle larger quantities more efficiently than a food processor.
- Cons: Requires a dedicated appliance that many home cooks may not own, can be more expensive, cleaning can be more involved due to multiple parts.
- Best for: Serious home butchers, those who grind large amounts of meat regularly, or those who want the most consistent, traditional ground meat texture.
Blender (high-powered)
- Pros: Some high-powered blenders (like certain Ninja models) can be used for grinding small batches of meat.
- Cons: High risk of over-processing into a paste, not ideal for larger quantities, can strain the blender motor, texture is often less consistent than a food processor or meat grinder.
- Best for: Very small, occasional batches when no other option is available, and extreme caution is taken with pulsing.
Hand-chopping
- Pros: Requires no special equipment beyond a sharp knife and cutting board, offers complete control over texture, no risk of over-processing into paste.
- Cons: Extremely labor-intensive and time-consuming, especially for larger quantities, results in a coarser, more rustic texture that may not be suitable for all recipes.
- Best for: Small amounts of chicken where a very coarse, hand-chopped texture is desired, or when no other equipment is available.
Here’s a quick comparison table:
| Feature | Food Processor | Meat Grinder | High-Powered Blender | Hand-Chopping |
|---|---|---|---|---|
| **Texture Control** | Good (via pulsing) | Excellent (multiple plates) | Poor (high risk of paste) | Excellent (rustic) |
| **Ease of Use** | Relatively easy | Moderate | Moderate | Labor-intensive |
| **Batch Size** | Moderate | Large | Very Small | Small |
| **Equipment Needed** | Standard kitchen appliance | Dedicated appliance | High-powered blender | Sharp knife & board |
| **Risk of Paste** | Moderate | Low | High | None |
| **Cost** | Moderate (if already owned) | High | High (if already owned) | Low |
In my experience, for the average home cook looking for a convenient and effective way to make ground chicken for everyday recipes, the food processor is the sweet spot. It balances ease of use with good control over texture, provided you follow the chilling and pulsing guidelines meticulously. If you’re frequently making large volumes of sausage or burger patties, investing in a dedicated meat grinder might be worthwhile.
Food Safety Considerations
Working with raw poultry requires strict adherence to food safety guidelines to prevent foodborne illnesses. Grinding chicken at home, while offering control, also means you are directly handling the raw meat, making these precautions even more critical.
Preventing Cross-contamination
- Cleanliness: Always start with a clean workspace, clean hands, and clean utensils. Wash your hands thoroughly with soap and warm water before and after handling raw chicken.
- Separate Surfaces: Use a dedicated cutting board for raw meat, or ensure that any board used for chicken is thoroughly washed and sanitized afterward. Avoid using the same board for vegetables or other ingredients that will be eaten raw.
- Utensils: Wash any knives, bowls, or spatulas that have come into contact with raw chicken immediately after use.
- Food Processor: As mentioned earlier, clean the food processor components thoroughly immediately after grinding.
Cooking Temperatures
- Internal Temperature: Ground chicken must be cooked to a safe internal temperature to kill harmful bacteria like Salmonella and Campylobacter. Use a meat thermometer to ensure it reaches 165°F (74°C). Insert the thermometer into the thickest part of the patty, meatball, or other formed product.
- Visual Cues: While color is not a foolproof indicator, ground chicken should no longer
Leave a Reply