
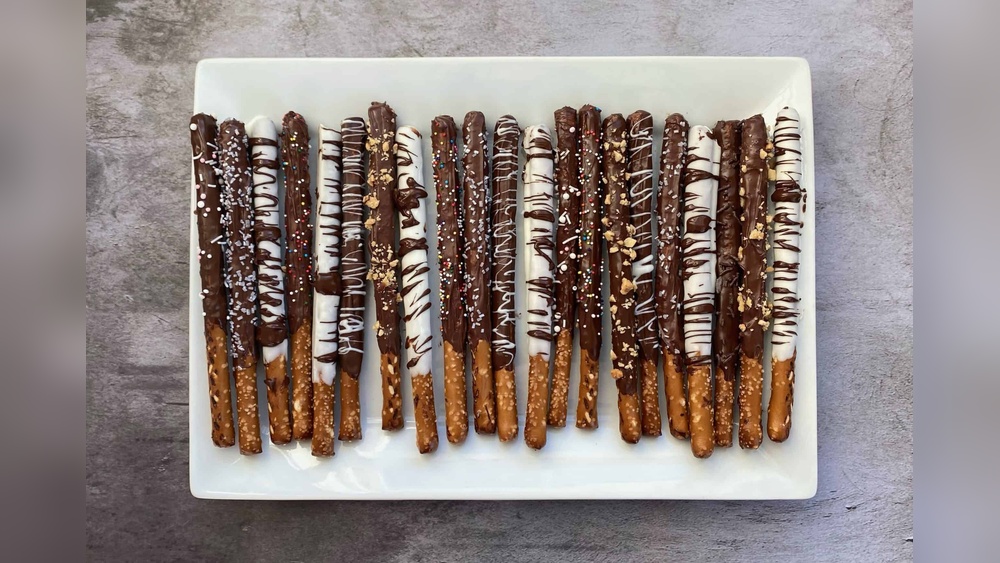
The humble pretzel, with its satisfying crunch and salty bite, is a beloved snack. But what happens when you take this classic treat and elevate it with the luxurious richness of chocolate? The result is a delightful confection that perfectly balances sweet and salty, crisp and smooth, chocolate-covered pretzels.
This simple yet elegant treat is surprisingly easy to make at home, offering a rewarding culinary project for beginners and a canvas for creativity for more experienced bakers. Whether you’re looking for a homemade gift, a party favor, or simply a delicious indulgence, mastering the art of the chocolate-covered pretzel is a skill worth acquiring.
Key Takeaways
- Chocolate Selection is Crucial: The type and quality of chocolate used significantly impact the final taste and texture.
- Melting Techniques Matter: Proper melting prevents scorching and ensures a smooth, dippable consistency.
- Pretzel Preparation: Choosing the right pretzels and ensuring they are dry is key to good adhesion.
- Dipping and Setting: A controlled dipping process and adequate setting time are essential for a professional finish.
- Decoration and Customization: Sprinkles, drizzles, and other additions offer endless possibilities for personalization.
- Storage is Important: Proper storage ensures your chocolate-covered pretzels stay fresh and delicious.
Understanding The Core Components
Creating perfect chocolate-covered pretzels involves a thoughtful consideration of the two primary elements: the pretzels themselves and the chocolate coating. Each plays a vital role in the final sensory experience.
Choosing The Right Pretzel Base
The foundation of your chocolate-covered creation is the pretzel. While any pretzel can technically be dipped, certain types lend themselves better to the process and yield superior results. The ideal pretzel offers a good surface area for the chocolate to adhere to, a satisfying crunch, and a balanced saltiness that complements the sweetness of the chocolate.
- Twist Pretzels: These are the most traditional and popular choice. Their nooks and crannies provide excellent texture and visual appeal once dipped. Look for medium-sized twists; smaller ones can be difficult to handle, and larger ones might overwhelm the chocolate.
- Sticks and Rods: Pretzel sticks offer a cleaner, more uniform look. They are easier to dip and can be arranged neatly. Rods are thicker and sturdier, providing a more substantial base.
- Shapes: Specialty pretzel shapes, like holiday-themed ones or small bites, can add a fun element, especially for themed events.
Considerations for Pretzel Quality:
- Freshness: Stale pretzels can be too soft or too brittle, affecting the snap and making them prone to breaking. Always use fresh pretzels.
- Salt Level: The salt on the pretzel is a key flavor component. While some prefer lightly salted, a moderate salt level generally offers the best contrast to the sweet chocolate. Be mindful that heavily salted pretzels might overpower milder chocolates.
- Surface Dryness: Ensure pretzels are completely dry before dipping. Any moisture can cause the chocolate to seize or bloom.
Selecting Your Chocolate
The quality and type of chocolate you choose will profoundly influence the flavor, texture, and appearance of your finished pretzels. This is where you can really elevate your homemade treat from good to gourmet.
- Compound Chocolate (Confectionery Coating): This is often the easiest to work with for beginners. It’s made with vegetable oil (like palm kernel oil) instead of cocoa butter. This formulation means it doesn’t require tempering, sets up quickly, and has a longer shelf life. It’s readily available in various flavors and colors. However, the taste is generally less rich and complex than real chocolate.
- Real Chocolate (Baking Chocolate): This contains cocoa butter and offers a superior flavor and melt. However, most real chocolates (dark, milk, and white) require tempering to achieve a glossy finish, a clean snap, and to prevent blooming (those unsightly white streaks).
- Dark Chocolate: Typically contains 50-70% cacao solids. It offers a rich, complex flavor that pairs wonderfully with the saltiness of pretzels.
- Milk Chocolate: Sweeter and creamier than dark chocolate, it’s a crowd-pleaser. Its sweetness can be a lovely contrast to the salty pretzel.
- White Chocolate: Technically not chocolate as it contains no cocoa solids, only cocoa butter, sugar, and milk solids. It offers a sweet, creamy flavor that can be a delightful base for vibrant decorations.
Pro Tip: For the best flavor, opt for good quality baking chocolate or couverture chocolate if you’re willing to temper it. If ease and speed are your priority, high-quality compound chocolate is a perfectly acceptable alternative.
:max_bytes(150000):strip_icc()/__opt__aboutcom__coeus__resources__content_migration__simply_recipes__uploads__2016__10__Chocolate-Covered-Pretzels-horiz-a-1600-301e6be183144221b2952988caac7607.jpg)
The Art Of Melting Chocolate
Successfully melting chocolate is a critical step. Improper melting can lead to burnt chocolate, seized chocolate (clumpy and unusable), or a dull, streaky finish. There are several methods, each with its own advantages.
Double Boiler Method
This is a classic and reliable method for melting chocolate gently and evenly.
- Set up: Fill the bottom of a double boiler (or a heatproof bowl set over a saucepan) with about an inch of water. Ensure the bottom of the bowl does not touch the water.
- Heat Water: Bring the water to a gentle simmer over medium-low heat.
- Melt Chocolate: Place your chopped chocolate or chocolate chips in the top bowl or insert. Stir occasionally until the chocolate is almost entirely melted.
- Remove from Heat: Once mostly melted, remove the bowl from the heat and stir until the residual heat melts the remaining chocolate. This prevents overheating.
Why it works: The steam from the simmering water gently heats the chocolate without direct contact with the heat source, minimizing the risk of scorching.
Microwave Method
This is the quickest method but requires careful attention to prevent overheating.
- Chop Chocolate: If using a bar, chop it into small, uniform pieces.
- Short Intervals: Place the chocolate in a microwave-safe bowl. Microwave on 50% power for 30-second intervals, stirring thoroughly after each interval.
- Stir Until Smooth: Continue microwaving and stirring until the chocolate is smooth and fully melted. Be patient; it’s better to under-melt and stir than to overheat.
Warning: Chocolate can burn very quickly in the microwave. Always use lower power settings and short intervals, and stir frequently.
Using A Melting Pot Or Chocolate Fountain
Specialized appliances like chocolate melting pots or small chocolate fountains offer a convenient way to keep chocolate at the ideal dipping temperature. These devices maintain a consistent, low heat, making them ideal for continuous dipping.
Data Point: The ideal melting range for most chocolate is between 105°F (40.5°C) and 115°F (46°C). Exceeding these temperatures can damage the cocoa butter structure.
Tempering Chocolate: The Professional Touch
Tempering is the process of heating and cooling chocolate to specific temperatures, then agitating it to stabilize the cocoa butter crystals. Properly tempered chocolate is glossy, snaps cleanly when broken, melts smoothly in the mouth, and resists bloom. While it adds a layer of complexity, the results are significantly superior.
Why Temper?
- Glossy Finish: Untempered chocolate often looks dull or chalky.
- Snap: Tempered chocolate breaks with a satisfying “snap.” Untempered chocolate bends or crumbles.
- Melt: It melts smoothly on the tongue, not chalky or greasy.
- Bloom Resistance: Prevents fat bloom (white streaks) and sugar bloom (grainy texture).
Common Tempering Methods
- Seeding Method: Melt about two-thirds of your chocolate using the double boiler method. Remove from heat. Add the remaining one-third of finely chopped chocolate (the “seed”) and stir constantly until it melts and the mixture reaches the correct temperature (around 88-90°F or 31-32°C for dark chocolate).
- Tabling Method: Melt chocolate as above. Pour about two-thirds of it onto a clean, cool marble slab or granite countertop. Spread it out and scrape it with an offset spatula until it cools slightly and thickens. Reincorporate the cooled chocolate back into the remaining melted chocolate in the bowl, stirring until smooth and at the correct temperature.
- Mycryo™ Method: This involves using pre-tempered Mycryo™ cocoa butter (a powdered form of cocoa butter) which you melt into your chocolate. It’s a more advanced technique.
Note: Compound chocolate does not require tempering. If you’re using it, simply melt it according to the package directions.
The Dipping And Decorating Process
Once your chocolate is perfectly melted (and tempered, if using real chocolate), it’s time for the main event: dipping the pretzels and adding those delightful finishing touches.
Preparing For Dipping
- Line Baking Sheets: Cover baking sheets with parchment paper or wax paper. This provides a non-stick surface for the dipped pretzels to set on.
- Dipping Tools: Have your tools ready. A fork, a dipping tool, or even chopsticks can be used to hold the pretzel while dipping. A skewer can also work for pretzel rods.
- Work Area: Ensure your workspace is clean and cool. Warm temperatures can cause the chocolate to melt too quickly.
Dipping Techniques
- Hold the Pretzel: Gently hold the pretzel by one end.
- Dip: Submerge the pretzel into the melted chocolate, leaving a portion of the pretzel uncoated for a handle, or dip it fully.
- Coat Evenly: Swirl the pretzel gently to ensure an even coating. You can use your dipping tool to help spread the chocolate if needed.
- Remove Excess: Lift the pretzel out of the chocolate and allow excess chocolate to drip back into the bowl. You can gently tap the tool against the side of the bowl or use the edge of the bowl to scrape off excess.
- Place on Baking Sheet: Carefully place the dipped pretzel onto the prepared baking sheet.
Pro Tip: If dipping pretzel rods, you can use a skewer inserted into one end for easier handling. Once set, you can remove the skewer and fill the hole with a dab of chocolate, or leave it as is.
Adding Decorations
This is where you can let your creativity shine! Decorations should be added while the chocolate coating is still wet so they adhere properly.
- Sprinkles: The most classic topping. Use jimmies, nonpareils, sanding sugar, or themed sprinkles.
- Drizzles: Melt a contrasting color of chocolate (or compound coating) and place it in a piping bag or a zip-top bag with a corner snipped off. Drizzle thin lines over the set chocolate.
- Crushed Nuts: Toasted and finely chopped nuts like almonds, pecans, or pistachios add texture and flavor.
- Crushed Candies: Crushed peppermint candies, toffee bits, or mini chocolate chips can add extra crunch and flavor.
- Edible Glitter or Luster Dust: For a touch of sparkle.
- Sea Salt Flakes: A sprinkle of flaky sea salt just after dipping can enhance the sweet and salty profile.
Example: For a festive look, dip pretzels in white chocolate and immediately cover them with green and red sprinkles for a Christmas theme, or use pastel colors for Easter.
Setting And Storage
Once decorated, the chocolate-covered pretzels need time to set completely. Proper setting and storage are crucial for maintaining their quality and appearance.
Allowing Pretzels To Set
- Room Temperature vs. Refrigerator:
- Room Temperature: If your chocolate is properly tempered (or if using compound chocolate in a cool environment), allowing pretzels to set at cool room temperature (around 65-70°F or 18-21°C) is ideal. This prevents condensation from forming, which can dull the shine. This can take 1-2 hours depending on thickness and ambient temperature.
- Refrigerator: If your kitchen is warm, you can speed up the setting process by placing the baking sheets in the refrigerator. Place them in for about 15-20 minutes, or until the chocolate is firm. Be cautious, as refrigeration can sometimes cause condensation or a dull finish if the pretzels are not properly sealed before storing.
Data Point: Properly tempered chocolate will set firm within minutes at room temperature, while compound coatings might take slightly longer.
Storage Guidelines
- Airtight Container: Once completely set, store chocolate-covered pretzels in an airtight container. This protects them from moisture and strong odors in the refrigerator or pantry.
- Layering: If stacking pretzels, place a layer of parchment paper or wax paper between layers to prevent sticking.
- Temperature: Store in a cool, dry place. Avoid direct sunlight or heat, which can cause the chocolate to melt or bloom.
- Shelf Life:
- Compound Chocolate: Can last for several weeks, even months, if stored properly.
- Real Chocolate: Best consumed within 1-2 weeks for optimal freshness and flavor. The fats and sugars in real chocolate can degrade over time.
Warning: Never store chocolate-covered pretzels in a humid environment, as moisture is the enemy of chocolate and can lead to blooming or a sticky texture.
Troubleshooting Common Issues
Even with careful preparation, you might encounter a few hiccups along the way. Knowing how to address common problems can save your batch of treats.
Chocolate Not Setting
- Cause: Could be due to using low-quality chocolate, incorrect tempering, or a warm environment. Compound chocolate should set relatively quickly. Real chocolate that isn’t properly tempered may remain soft.
- Solution: If using real chocolate, re-temper it. If using compound chocolate in a warm room, move the baking sheets to a cooler area or the refrigerator. Ensure you haven’t added anything that might prevent setting, like excess liquid.
Chocolate Blooming (white Streaks/spots)
- Cause: This is usually due to unstable cocoa butter crystals (improper tempering) or condensation from temperature fluctuations. Fat bloom appears as grayish-white streaks, while sugar bloom looks like a grainy, whitish coating.
- Solution: For untempered chocolate, the only fix is to re-melt and re-temper if using real chocolate. If condensation is the issue, ensure pretzels are fully set before refrigerating and store them in an airtight container at a stable room temperature. While bloom is unsightly, it doesn’t affect the safety or taste significantly.
Chocolate Seizing
- Cause: This happens when a small amount of water comes into contact with melted chocolate. The sugar and cocoa solids clump together, making the chocolate thick, stiff, and grainy.
- Solution: If seized chocolate is caught very early, you might be able to save it by vigorously stirring in a small amount of warm liquid (like melted butter or oil, about 1 teaspoon per 6 ounces of chocolate) to create a ganache. However, often seized chocolate is best discarded. Prevent this by ensuring all utensils and bowls are completely dry, and avoid adding any water-based ingredients.
Pretzels Breaking
- Cause: Using stale, overly brittle pretzels, or handling them too roughly during dipping.
- Solution: Use fresh pretzels. Handle them gently, especially when dipping and transferring them to the baking sheet. If a pretzel breaks, you can often salvage it by using the pieces for a “pretzel bark” type treat.
Creative Variations And Flavor Pairings
Once you’ve mastered the basic chocolate-covered pretzel, the possibilities for variations are nearly endless. Experimenting with different chocolates, additions, and flavor profiles can lead to exciting new creations.
Chocolate Flavor Combinations
- Dark Chocolate with Chili or Sea Salt: The intensity of dark chocolate pairs beautifully with a hint of heat or a sprinkle of flaky sea salt.
- Milk Chocolate with Toffee or Caramel: The sweetness of milk chocolate is complemented by the buttery crunch of toffee or the gooey richness of caramel.
- White Chocolate with Matcha or Raspberry: White chocolate’s creamy sweetness can be balanced by the earthy notes of matcha or the tartness of freeze-dried raspberries.
- Ruby Chocolate: This naturally pink chocolate offers a unique berry-like flavor that pairs well with nuts or dried fruits.
Incorporating Other Ingredients
- Inside the Chocolate: Before the chocolate sets, press in small candies, chopped nuts, or edible glitter.
- Layered Drizzles: After the initial chocolate coating has set, drizzle with multiple contrasting colors or flavors of chocolate.
- Pretzel Bark: Break up larger dipped pretzel pieces and mix them with other ingredients like marshmallows, dried fruit, or cookie crumbles, then drizzle with more chocolate. This is a great way to use up broken pieces.
Themed Pretzel Creations
- Holiday: Use colored chocolates and themed sprinkles (e.g., green and red for Christmas, pastels for Easter, orange and black for Halloween).
- Team Spirit: Use chocolates and sprinkles in your favorite sports team’s colors.
- Baby Showers/Weddings: Use pastel colors, edible pearls, or personalized edible toppers.
Comparison Table: Chocolate Types for Dipping
| Chocolate Type | Pros | Cons | Best For |
|---|---|---|---|
| **Compound Coating** | Easy to use, no tempering required, sets fast | Less complex flavor, can taste waxy | Beginners, quick projects, colorful coatings |
| **Dark Chocolate** | Rich flavor, good snap when tempered | Requires tempering, can be bitter if too high cacao % | Classic taste, sophisticated treats |
| **Milk Chocolate** | Creamy, sweet, crowd-pleasing | Requires tempering, can be too sweet for some | Sweet treats, pairings with salty additions |
| **White Chocolate** | Sweet, creamy, excellent base for colors | Requires tempering, can be overly sweet | Colorful decorations, bright flavor profiles |
| **Ruby Chocolate** | Unique berry flavor, natural pink color | Can be finicky to temper, expensive | Novelty treats, visually striking creations |
Frequently Asked Questions
What Is The Best Way To Store Chocolate-covered Pretzels?
The best way to store chocolate-covered pretzels is in an airtight container at cool room temperature (around 65-70°F or 18-21°C). Avoid humidity and direct sunlight. If your home is very warm, you can refrigerate them, but ensure they are in a sealed container to prevent moisture absorption, and allow them to come to room temperature gradually before serving to minimize condensation.
Can I Use Chocolate Chips To Make Chocolate-covered Pretzels?
Yes, you can use chocolate chips, but it’s important to know that many standard chocolate chips contain stabilizers that can affect their melting and setting properties. For the best results, use high-quality baking chocolate (bars chopped finely) or specifically designed melting wafers or compound coatings.
If using chips, they might require a little extra stirring and might not achieve the same glossy finish as other types.
How Do I Prevent Chocolate From Seizing When Melting?
Chocolate seizes when it comes into contact with even a small amount of water. Ensure all your bowls, utensils, and workspaces are completely dry. When using the double boiler method, make sure the bottom of the bowl doesn’t touch the simmering water, and avoid splashing water into the chocolate.
If using the microwave, be extra careful about moisture.
My Chocolate-covered Pretzels Don’t Have A Shiny Finish. What Did I Do Wrong?
A dull or streaky finish usually indicates that the chocolate was not properly tempered (if you used real chocolate) or that it overheated. Overheating can damage the cocoa butter crystals. If using compound chocolate, it should generally set with a decent shine, so if it’s dull, it might be an issue with the product itself or the temperature at which it set.
Allowing tempered chocolate to set at a cool room temperature typically yields the best gloss.
How Long Do Chocolate-covered Pretzels Last?
The shelf life depends on the type of chocolate used. Chocolate-covered pretzels made with compound coating can last for several weeks to a couple of months if stored correctly in an airtight container in a cool, dry place. Those made with real, tempered chocolate are best enjoyed within 1 to 2 weeks for optimal flavor and texture, as the chocolate can begin to degrade or bloom over longer periods.
The journey from a simple pretzel to a decadent chocolate-covered delight is a rewarding one, offering a perfect blend of simplicity and sophistication. By understanding the nuances of chocolate selection, mastering melting and tempering techniques, and employing careful dipping and decorating strategies, you can create treats that are as beautiful as they are delicious.
Whether you stick to classic combinations or embark on adventurous flavor pairings, the art of the chocolate-covered pretzel is a versatile skill that brings joy to both the maker and the recipient. So gather your ingredients, embrace the process, and get ready to enjoy the delightful crunch and rich chocolatey embrace of your homemade creations.
Leave a Reply