
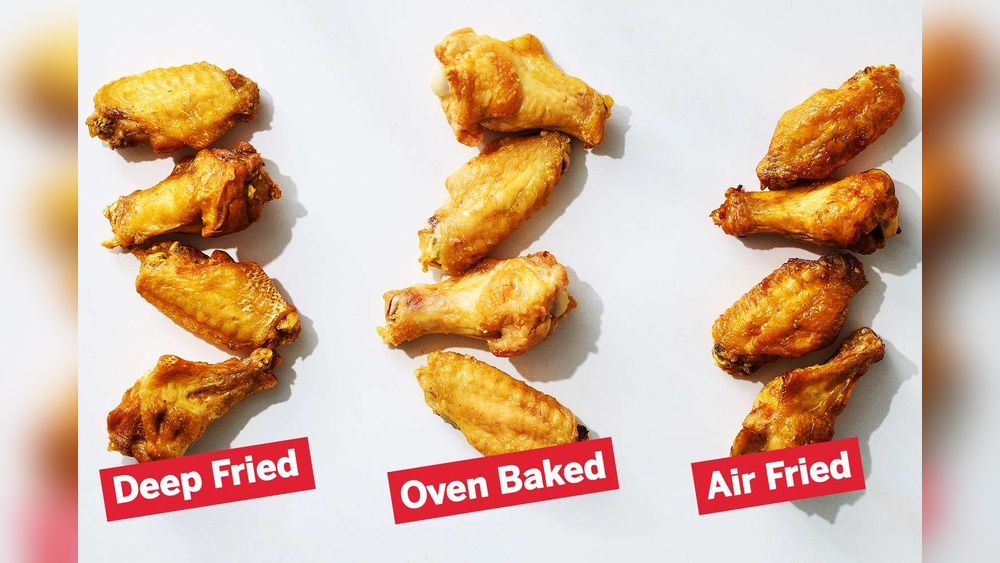
Achieving perfectly crispy chicken wings at home without a deep fryer might seem like a culinary challenge, but it’s entirely within reach. Many home cooks associate deep-fried wings with that irresistible crunch, often believing oven-baked versions will inevitably be soggy or dry. However, with the right techniques and a little know-how, you can create oven-baked wings that rival their fried counterparts in both texture and flavor. This guide will walk you through the essential steps, from selecting the best chicken cuts to mastering the baking process for ultimate crispiness.
Forget the greasy mess and the specialized equipment of deep frying. Baking chicken wings in the oven is a healthier, more accessible, and surprisingly effective method for achieving that sought-after crispy skin and juicy interior. Whether you’re preparing them for a game day feast, a casual get-together, or just a delicious weeknight meal, understanding the science behind crisping chicken skin is key.
We’ll explore the crucial elements like proper drying, the role of baking powder, optimal oven temperatures, and strategic flipping to ensure every bite is a delightful balance of crunch and succulence.
Key Takeaways
- Dry is King: Thoroughly drying chicken wings before cooking is paramount for achieving crispy skin. Moisture is the enemy of crispiness.
- Baking Powder Magic: A small amount of baking powder (not baking soda) mixed with salt can significantly enhance skin crispiness by raising the pH and aiding in browning.
- Temperature Matters: High heat is essential. Baking at 400-425°F (200-220°C) promotes rapid rendering of fat and crisping of the skin.
- Wire Rack is Your Friend: Elevating wings on a wire rack allows air to circulate freely around them, preventing them from steaming in their own juices and ensuring even crisping.
- Don’t Overcrowd: Give your wings space on the baking sheet. Overcrowding leads to steaming, which is detrimental to crispiness.
- Flip Strategically: Flipping the wings halfway through the cooking process ensures both sides get equally crispy.
- Pat Dry After Saucing: If saucing before the final crisping stage, pat the wings dry again before returning them to the oven.
Understanding The Science Of Crispy Chicken Skin
The quest for crispy chicken wings hinges on a fundamental culinary principle: moisture evaporation and fat rendering. Chicken skin is primarily composed of collagen and fat. When exposed to high heat, the collagen breaks down, becoming gelatinous, while the fat renders out from beneath the skin. This rendered fat then crisps the skin from the inside out. However, any surface moisture acts as a barrier, hindering this process. Water has a lower boiling point than fat and will steam the skin rather than allowing it to crisp and brown. Therefore, the entire strategy for oven-crisped wings revolves around minimizing surface moisture and maximizing heat exposure.
The Crucial Role Of Drying
This is arguably the most critical step in achieving crispy wings. Before any seasoning or cooking takes place, the chicken wings must be meticulously dried. Patting them down with paper towels is the standard method. For an extra edge, consider air-drying them in the refrigerator. After patting them dry, place the wings on a wire rack set over a baking sheet and leave them uncovered in the fridge for at least a few hours, or even overnight. This allows the surface moisture to evaporate, tightening the skin and setting the stage for superior crispiness. This technique is often employed by professional chefs for achieving perfectly roasted poultry skin.
The Baking Powder Advantage
A well-kept secret among home cooks and professional chefs alike is the use of baking powder. When mixed with salt and applied to the wings, baking powder acts as a chemical leavener. It raises the pH of the chicken skin, which in turn breaks down proteins and aids in the Maillard reaction, the complex chemical process responsible for browning and flavor development. Crucially, it also helps to dry out the skin further, promoting crispiness.
Important Note: Use baking powder, not baking soda. Baking soda has a much higher alkaline content and can impart a metallic or soapy taste if used incorrectly. The typical ratio is about 1 tablespoon of baking powder per pound of chicken wings.
The Impact Of Salt
Salt plays a dual role in wing preparation. Firstly, it enhances flavor. Secondly, and more importantly for crispiness, salt is a hygroscopic substance, meaning it draws moisture out of the chicken skin. When you salt your wings, even after drying, the salt begins to pull out residual moisture, further aiding in the drying process and contributing to a crispier finish.

Selecting And Preparing Your Chicken Wings
The type of chicken wing cut you choose and how you prepare it can significantly impact the final outcome. Understanding the anatomy of a chicken wing and making smart choices during preparation will set you up for success.
Drumettes Vs. Flats Vs. Wingtips
Chicken wings are typically divided into three parts:
- Drumettes: These resemble small drumsticks, with a single bone. They tend to be meatier and easier to eat.
- Flats (or Middles): These are the middle sections, characterized by two parallel bones. They often have more skin and connective tissue, which can render down beautifully to create a delightfully crispy texture.
- Wingtips: These are the very ends of the wings. They contain very little meat and are often discarded or saved for making stock. While they can get crispy, they offer less meat for consumption.
For the best balance of meat and crispy skin, a mix of drumettes and flats is ideal. When purchasing wings, look for plump, meaty pieces. If you buy whole wings, you’ll need to separate them.
How To Break Down Chicken Wings
If you’ve purchased whole chicken wings, you’ll need to separate them into drumettes and flats. This is a straightforward process that requires a sharp knife or poultry shears.
- Locate the Joints: Lay a wing flat on a cutting board. Feel for the two joints that connect the drumette, flat, and wingtip.
- Cut Through the Joints: Using a sharp chef’s knife or sturdy kitchen shears, cut directly through the center of each joint. You’ll often feel a slight “give” as you cut through the cartilage.
- Discard or Save Wingtips: Once separated, you’ll have three pieces: the drumette, the flat (which might still have the wingtip attached), and the wingtip. Cut off the wingtip at the joint where it meets the flat. You can discard the wingtips or save them for making homemade chicken stock.
This process requires a bit of practice, but with a good knife, it becomes quick and easy. A quality kitchen knife set can make this task much simpler and safer.
The Importance Of Patting Dry
As mentioned earlier, this step cannot be overstated. After separating the wings, regardless of whether they are fresh or thawed, they will contain surface moisture. Use absorbent paper towels to pat each wing piece thoroughly dry. Get into all the nooks and crannies. For optimal results, follow this with the refrigerator air-drying method.

The Ultimate Oven-baking Method For Crispy Wings
Once your wings are prepped and dried, it’s time to move on to the cooking process. This method focuses on high heat and proper air circulation to achieve that coveted crispiness.
Step-by-step Baking Instructions
- Preheat Your Oven: Set your oven to 400-425°F (200-220°C). A higher temperature is crucial for rendering fat and crisping the skin quickly without overcooking the meat.
- Prepare Your Baking Sheet: Line a sturdy baking sheet with parchment paper or aluminum foil for easier cleanup. However, for maximum crispiness, especially on the bottom, it’s best to place a wire rack inside the baking sheet. This elevates the wings, allowing hot air to circulate around them on all sides.
- Season the Wings: In a large bowl, toss the thoroughly dried chicken wings with your desired seasonings. This typically includes salt, pepper, and garlic powder. If you’re using the baking powder trick, mix about 1 tablespoon of baking powder per pound of wings with your salt and other dry seasonings, then toss to coat evenly. Ensure each wing is lightly and evenly coated.
- Arrange Wings on the Rack: Place the seasoned wings in a single layer on the prepared wire rack. Ensure there is ample space between each wing; do not let them touch or overlap. This prevents steaming and allows for even heat exposure.
- Bake for the First Stage: Place the baking sheet in the preheated oven. Bake for approximately 20-25 minutes.
- Flip the Wings: Remove the baking sheet from the oven. Using tongs, carefully flip each chicken wing. This ensures that both sides of the wing get exposed to the direct heat and develop a crispy texture.
- Bake for the Second Stage: Return the baking sheet to the oven and bake for another 20-25 minutes, or until the wings are golden brown, crispy, and cooked through. The internal temperature should reach at least 165°F (74°C).
- Rest (Optional but Recommended): Once cooked, remove the wings from the oven. Let them rest on the wire rack for 5-10 minutes before saucing or serving. This allows the juices to redistribute, resulting in a more tender and flavorful wing.
Optimizing Oven Temperature And Time
The temperature and time are critical variables. Too low a temperature, and the wings will steam and become rubbery. Too high, and they might burn before cooking through. The 400-425°F (200-220°C) range is generally considered the sweet spot.
- At 400°F (200°C): You might need a slightly longer cooking time, around 45-55 minutes total, with flipping. This is a good option if your oven tends to run very hot.
- At 425°F (220°C): Cooking time will be shorter, around 40-50 minutes total. This higher heat crisps the skin more aggressively.
Always keep an eye on your wings, as oven performance can vary. Look for visual cues: golden-brown color, visible crisping of the skin, and no pinkness near the bone.
The Wire Rack Advantage Explained
Using a wire rack is a simple yet highly effective technique. When wings are placed directly on a baking sheet, the bottom surfaces are insulated from the hot air and sit in their own rendered fat and juices. This leads to uneven crisping and can result in a soggy bottom. A wire rack allows air circulation on all sides, promoting even browning and crisping. It essentially creates a mini convection environment within your oven.
Saucing Your Crispy Oven Wings
The sauce is where much of the flavor comes from, but adding it too early can ruin the crispiness you’ve worked hard to achieve. The timing and method of saucing are key.
When To Sauce: The Two-stage Approach
The most effective way to sauce crispy oven wings is to do it after the initial baking and crisping phase, or in a very brief final stage.
- Sauce After Baking: Bake the wings until they are fully cooked and crispy. Remove them from the oven, let them rest for a few minutes, then toss them in your chosen sauce in a clean bowl. Serve immediately. This preserves the maximum crispiness.
- The Final Crisp Sauce: For a sauce that adheres better and gets slightly caramelized, toss the crispy wings in sauce after baking and resting. Then, return them to the oven on a baking sheet (or back on the wire rack) for a final 3-5 minutes at the same high temperature. Watch them closely to prevent burning. This method offers a good balance of crispiness and sauced flavor.
Popular Sauce Options And Preparation
The possibilities for wing sauces are endless, ranging from classic Buffalo to sweet and savory teriyaki.
- Classic Buffalo: A simple mixture of hot sauce (like Frank’s RedHot) and melted butter. Adjust the ratio to your spice preference.
- BBQ: Use your favorite store-bought BBQ sauce or make your own.
- Garlic Parmesan: Melted butter, minced garlic, grated Parmesan cheese, and Italian herbs.
- Honey Sriracha: A blend of honey, sriracha, soy sauce, and a touch of lime juice.
- Teriyaki: A classic glaze made with soy sauce, mirin, sake, sugar, and ginger.
Pro Tip: If you’re making a thicker sauce or glaze, you might want to warm it slightly before tossing the wings. This helps it coat more evenly.
Preventing Soggy Wings After Saucing
The biggest enemy of crispiness after saucing is excess liquid in the sauce.
- Thicken Sauces: If your sauce is very thin, consider simmering it for a few minutes to reduce and thicken it before tossing the wings.
- Pat Dry Again: If you’ve tossed the wings in a particularly wet sauce, you can even give them a quick pat with paper towels after saucing before returning them to the oven for the final crisping stage. This removes some of the excess moisture.
Troubleshooting Common Oven-wing Issues
Even with the best instructions, sometimes things don’t go perfectly. Here are solutions to common problems encountered when making crispy oven-baked chicken wings.
Wings Aren’t Crispy Enough
- Insufficient Drying: The most common culprit. Ensure you are drying the wings *extremely* well. Consider the refrigerator air-drying method.
- Oven Temperature Too Low: Make sure your oven is accurately preheated to at least 400°F (200°C). Use an oven thermometer to verify.
- Overcrowding the Pan: Wings need space to allow air circulation. Use a larger baking sheet or two smaller ones, ensuring a single layer with no touching wings.
- Using a Wire Rack: If you’re not using a wire rack, start now. It makes a significant difference.
- Not Enough Baking Powder: If you’re using baking powder, ensure you’re using the correct amount (approx. 1 tbsp per pound).
Wings Are Dry And Tough
- Overcooking: While high heat is necessary for crisping, prolonged cooking can dry out the meat. Use a meat thermometer to ensure wings reach an internal temperature of 165°F (74°C) and then remove them promptly.
- Baking Too Long at a Lower Temperature: If you’re baking at a lower temp for longer, you risk drying out the meat before the skin crisps properly. Stick to the higher temperature range.
- Wing Size: Smaller wings will cook faster and can dry out more easily than larger ones. Adjust cooking time accordingly.
Wings Are Burnt On The Outside, Undercooked Inside
- Oven Hot Spots: Ovens can have uneven heating. Rotating the baking sheet halfway through the cooking process (in addition to flipping the wings) can help.
- Oven Temperature Too High: While high heat is good, if your oven runs significantly hotter than the dial indicates, the outside will burn quickly. Use an oven thermometer and consider reducing the temperature slightly (e.g., to 400°F or 390°F).
- Uneven Wing Size: If you have a mix of very large and very small wings, they may cook at different rates. Try to group similar-sized wings together if possible, or remove smaller ones earlier.
Flavor Variations And Presentation Ideas
Once you’ve mastered the basic crispy wing technique, you can explore a world of flavors and presentation styles.
Beyond Buffalo: Creative Flavor Combinations
- Spicy Korean Gochujang: Combine gochujang paste with honey, soy sauce, garlic, ginger, and sesame oil for a sweet, spicy, and savory glaze.
- Lemon Pepper: A classic dry rub made with lemon zest, black pepper, salt, garlic powder, and onion powder.
- Smoked Paprika and Herb: A smoky and aromatic rub featuring smoked paprika, dried rosemary, thyme, garlic powder, and salt.
- Mango Habanero: Blend fresh mango, habanero peppers (adjust to heat preference), lime juice, and a touch of honey for a tropical kick.
- Salt and Vinegar: A tangy dry rub using salt, malt vinegar powder (or a splash of vinegar reduced to a powder), and black pepper.
Presentation Matters
- Serving Platter: Arrange the wings artfully on a platter. Consider alternating between flats and drumettes.
- Dipping Sauces: Offer a variety of dipping sauces on the side, ranch, blue cheese, extra buffalo sauce, or a cooling yogurt-based dip.
- Garnishes: Fresh chopped parsley, chives, sesame seeds, or thinly sliced scallions add visual appeal and freshness.
- Accompaniments: Serve with celery sticks, carrot sticks, and perhaps some oven-baked fries or onion rings for a complete appetizer experience.
Comparing Baking Methods
While this guide focuses on the high-heat baking rack method, other oven techniques exist. Here’s a brief comparison:
| Method | Key Features | Pros | Cons |
|---|---|---|---|
| **High-Heat Baking Rack** | 400-425°F (200-220°C), wire rack, flip halfway | Excellent crispiness, relatively quick, healthier than frying | Requires attention, potential for uneven cooking if pan is overcrowded |
| **Convection Bake** | Uses fan to circulate hot air, often at slightly lower temps (e.g., 375-400°F) | Faster and more even cooking, often results in crispier skin | May require adjusting recipe times/temps, some ovens have less effective convection fans |
| **Low-and-Slow then High-Heat** | Bake at a lower temp (e.g., 275°F) for an extended period, then finish at high heat (425°F) for crisping | Can render fat effectively, results in very tender meat | Takes significantly longer, requires two distinct cooking phases |
In my experience, the High-Heat Baking Rack method offers the best balance of crispiness, speed, and simplicity for most home cooks.
Frequently Asked Questions
Can I Use Frozen Chicken Wings?
Yes, but it’s highly recommended to thaw them completely before cooking. Frozen wings contain a lot of ice crystals, which will release a significant amount of water when heated. This excess moisture will steam the wings, making it very difficult, if not impossible, to achieve crispy skin. Thaw them in the refrigerator overnight for the best results.
How Do I Make My Oven Wings Crispy Without Baking Powder?
If you prefer not to use baking powder, focus intensely on the drying process. Pat the wings exceptionally dry with paper towels, then let them air dry uncovered on a wire rack in the refrigerator for at least 4 hours, or preferably overnight. Ensure you are using a high oven temperature (400-425°F / 200-220°C) and a wire rack to allow air circulation. A little extra cooking time might be needed to compensate for the lack of baking powder’s effect on pH.
Can I Cook Wings Directly On The Baking Sheet Without A Rack?
While you *can*, it’s not recommended if your primary goal is crispy wings. As explained earlier, placing wings directly on the baking sheet traps moisture and prevents the bottom from crisping. They will likely end up steamed and somewhat soggy on the underside. Investing in an inexpensive wire rack that fits inside your baking sheet is a small but impactful upgrade.
How Long Do Oven-baked Wings Last In The Refrigerator?
Cooked chicken wings can be safely stored in the refrigerator for 3 to 4 days. Ensure they are cooled completely before sealing them in an airtight container or wrapping them tightly. Reheat them in the oven or an air fryer at around 350°F (175°C) to help restore some crispiness, rather than using the microwave which tends to make them soggy.
What’s The Best Way To Reheat Crispy Oven Wings?
The best method for reheating crispy wings is to re-bake them in the oven. Place the wings on a baking sheet (preferably on a wire rack) and heat them in a preheated oven at around 350-375°F (175-190°C) for 10-15 minutes, or until heated through and the skin has regained some crispness. An air fryer is also an excellent option for reheating, often doing a better job of restoring crispiness than a microwave.
Mastering the art of crispy oven-baked chicken wings is a rewarding culinary skill. By paying close attention to drying the wings thoroughly, utilizing high heat, ensuring proper air circulation with a wire rack, and timing your saucing correctly, you can consistently achieve delicious, crunchy wings that rival any deep-fried version.
Experiment with different seasonings and sauces to discover your personal favorites, and enjoy the satisfaction of creating a crowd-pleasing appetizer or meal right in your
Leave a Reply