
The creamy, rich delight of homemade butter is a culinary experience that connects us to simpler times and offers unparalleled flavor. Far from being a complex, professional-kitchen-only endeavor, making butter from cream is surprisingly accessible, requiring minimal ingredients and a bit of patience.
Whether you’re looking to elevate your toast, enrich your baking, or simply enjoy the satisfaction of creating a staple food from scratch, this guide will walk you through the process step-by-step. Understanding the science behind butter making, from the fat globules in cream to the churning process, demystifies the transformation and empowers you to achieve perfect results every time.
Key Takeaways
- Simplicity is Key: Making butter requires only two main ingredients: heavy cream and a touch of salt (optional).
- The Right Cream Matters: Use high-fat content heavy cream or whipping cream (at least 30-36% fat) for the best results. Avoid ultra-pasteurized cream if possible.
- Churning Methods Vary: Butter can be made by hand (shaking in a jar), with a stand mixer, a food processor, or even a blender.
- Patience is a Virtue: The churning process involves separating the butterfat from the buttermilk, which can take anywhere from 5 to 30 minutes depending on the method.
- Washing is Crucial: Rinsing the butter with cold water removes residual buttermilk, extending its shelf life and improving flavor.
- Storage is Important: Properly stored homemade butter can last for several weeks in the refrigerator.
Understanding The Science: How Cream Becomes Butter
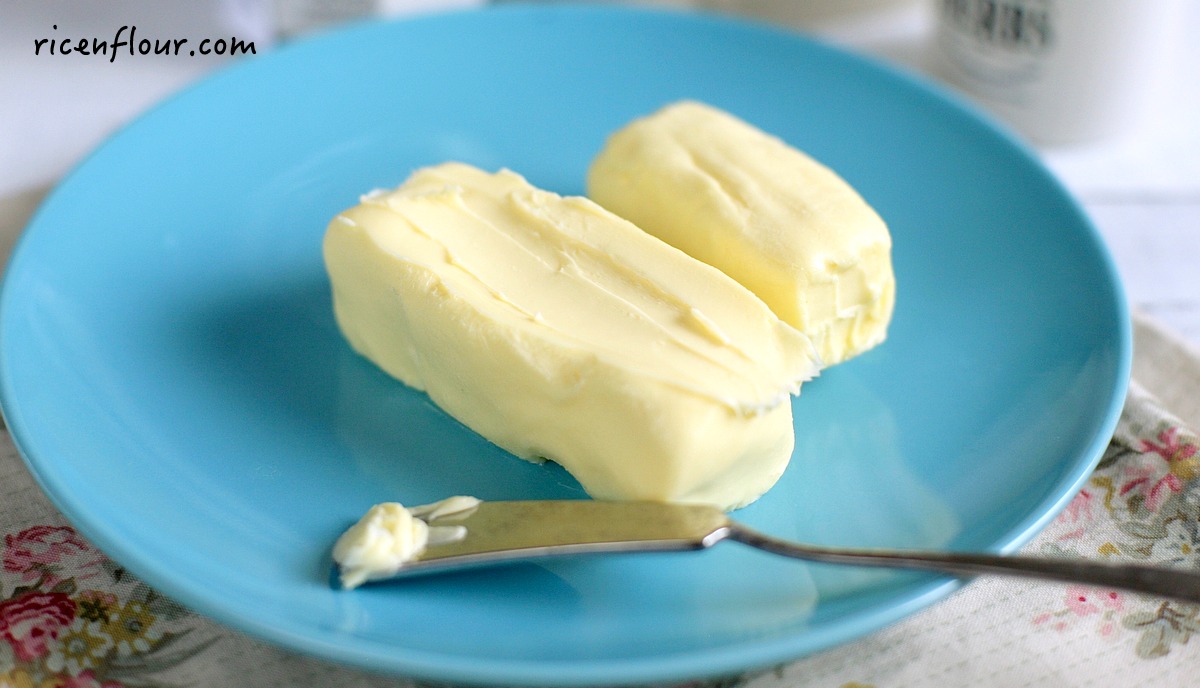
At its core, butter making is a process of emulsion breaking. Cream is essentially an emulsion of fat globules suspended in water. These fat globules are surrounded by a membrane. When you agitate the cream, this membrane begins to break down, allowing the fat globules to collide and coalesce. As more fat globules clump together, they eventually separate from the liquid (buttermilk) and form a solid mass, butter.
The Role Of Fat Content
The fat content of the cream is the most critical factor. Heavy cream, often labeled as whipping cream, typically contains between 30% and 36% milk fat. This higher fat percentage means there are more fat globules present, making the separation process more efficient and yielding a greater amount of butter. Lower fat creams, like half-and-half or whole milk, will not produce butter because they lack sufficient fat to form solid masses.
The Churning Process Explained
Churning is the mechanical action that disrupts the fat globule membranes. This can be achieved through various methods, all of which involve vigorous agitation.
- Mechanical Agitation: Whether you’re shaking a jar, whisking with a mixer, or blending, the goal is to constantly move and impact the cream. This friction and force cause the fat globules to rupture.
- Temperature Matters: The ideal temperature for churning is around 55-65°F (13-18°C). If the cream is too cold, the fat will be too solid to coalesce easily. If it’s too warm, the butter can become greasy and soft.
- From Liquid to Solid: As the fat globules merge, they push out the water and other components of the cream, which then form the liquid byproduct known as buttermilk. This separation is a clear indicator that butter is forming.
Choosing Your Cream: The Foundation Of Great Butter
The quality and type of cream you start with directly impact the ease of butter making and the final product’s taste and texture. Selecting the right cream is the first, and perhaps most crucial, step in this simple culinary journey.
Heavy Cream Vs. Whipping Cream
In most parts of the United States, “heavy cream” and “whipping cream” are often used interchangeably and typically contain at least 30-36% milk fat. However, some regions might differentiate slightly.
- Heavy Cream: Generally has a fat content of 36% or higher. It’s the richest option and will yield the most butter.
- Whipping Cream: Typically contains between 30% and 36% milk fat. It’s also an excellent choice for butter making.
It’s always best to check the label for the milk fat percentage. Aim for the highest percentage available.
The Impact Of Pasteurization
Pasteurization is a process that heats milk and cream to kill harmful bacteria. There are several types:
- HTST (High-Temperature Short-Time): This is the most common method and generally does not significantly impact butter making.
- Ultra-Pasteurized (UP): This method uses higher temperatures for a shorter time. While safe, ultra-pasteurized cream can sometimes be more challenging to turn into butter. The extreme heat can alter the protein structure around the fat globules, making them a bit more resistant to breaking. If you have the choice, opt for cream that is not ultra-pasteurized.
- Raw Cream: If you have access to certified raw cream from a trusted source, it can be excellent for butter making. However, be aware of the potential health risks associated with consuming raw dairy products.
Fat Content And Yield
The amount of butter you can expect to make is directly proportional to the fat content of your cream.
- General Rule: Approximately 2.5 to 3 cups of heavy cream will yield about 1 cup (or 1/2 pound) of butter. This can vary based on the exact fat percentage and the efficiency of your churning method.

Methods For Making Butter
There are several ways to churn cream into butter, ranging from old-fashioned manual methods to modern kitchen appliances. Each method requires the same core principle: vigorous agitation.
1. The Jar Method (manual Agitation)
This is the most basic and accessible method, perfect for small batches or when you want to involve children in the process. It requires patience and some arm strength.
Steps:
- Pour the Cream: Fill a clean, sturdy jar (like a mason jar) about halfway with heavy cream. Leave plenty of headspace for agitation.
- Seal Tightly: Ensure the lid is securely fastened to prevent leaks.
- Shake Vigorously: Begin shaking the jar. Initially, the cream will become foamy and then thicken. Keep shaking!
- Observe the Stages: After about 5-15 minutes of continuous shaking, you’ll notice the cream separating into two distinct components: a yellowish, solid mass (butter) and a cloudy liquid (buttermilk).
- Continue Shaking: Shake for another minute or two after separation to ensure all the fat has coalesced.
Pros: Requires no special equipment, great for small batches, good for demonstrating the process.
Cons: Labor-intensive, can take a while, results can be inconsistent.
2. The Stand Mixer Method
A stand mixer with a whisk attachment is one of the most efficient and popular ways to make butter at home. It significantly reduces the physical effort and time compared to the jar method.
Steps:
- Pour Cream into Mixer Bowl: Pour about 2-4 cups of cold heavy cream into the bowl of your stand mixer.
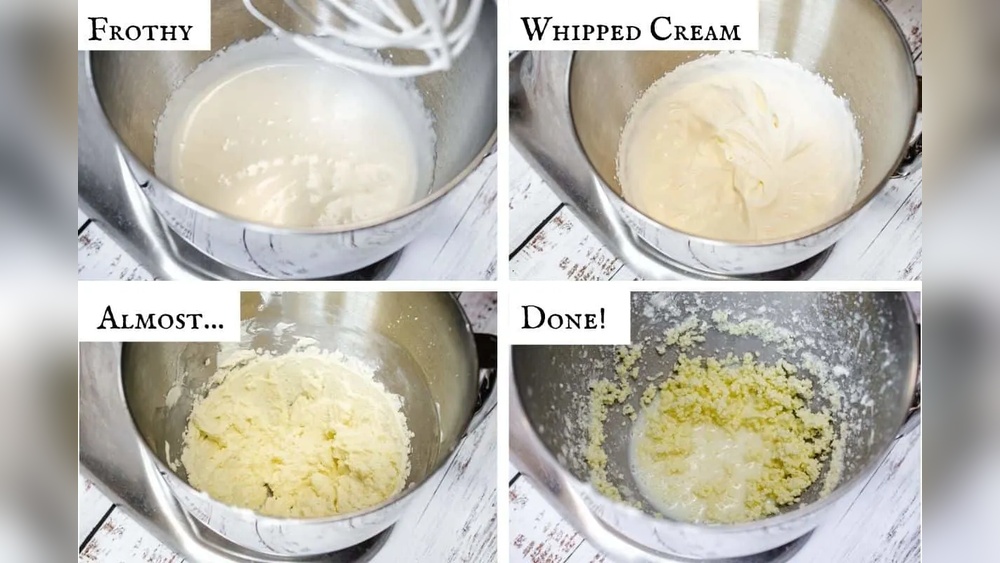
- Start on Low Speed: Begin mixing on a low speed. The cream will whip and become thicker, eventually forming soft peaks.
- Increase Speed: Gradually increase the speed to medium-high. The cream will continue to whip, passing through stiff peaks and then starting to look grainy or curdled.
- Watch for Separation: Continue mixing. You’ll see the mixture begin to splash and separate. The fat will start clumping together, and you’ll see liquid buttermilk forming.
- Mix Until Churned: Let the mixer run until the butter has clearly separated from the buttermilk. This usually takes about 5-10 minutes, depending on your mixer’s power and the cream’s temperature.
- Drain Buttermilk: Carefully pour off the buttermilk. You can reserve this for baking!
Pros: Efficient, requires minimal physical effort, good for larger batches, relatively quick.
Cons: Requires a stand mixer, can be messy if not careful.
3. The Food Processor Method
A food processor can also be used to make butter, offering a similar speed advantage to a stand mixer.
Steps:
- Add Cream: Pour cold heavy cream into the food processor bowl. Fill it no more than halfway.
- Process in Pulses: Start by pulsing a few times, then run continuously.
- Monitor Progress: Similar to the stand mixer, the cream will go through stages: whipped cream, then curdled, and finally, separation of butter and buttermilk.
- Process Until Separated: Continue processing until the butter forms a solid mass and pulls away from the sides of the bowl. This typically takes 5-8 minutes.
- Drain Buttermilk: Pour off the buttermilk.
Pros: Fast and efficient, good for medium to large batches.
Cons: Requires a food processor, can be noisy, potential for overheating if run too long.
4. The Blender Method
While a blender can work, it requires careful monitoring to avoid overheating the motor or over-processing the butter into a greasy paste. Personal blenders or smaller countertop blenders are often best for this.
Steps:
- Add Cream: Pour cold heavy cream into the blender jar, filling it no more than halfway.
- Blend in Intervals: Start blending on a low speed, then increase. You’ll need to stop and scrape down the sides periodically.
- Watch for Separation: Blend until you see the butter separating from the buttermilk. This might take 3-7 minutes.
- Avoid Over-Blending: Be cautious not to over-blend, which can melt the butterfat.
- Drain Buttermilk: Carefully pour off the buttermilk.
Pros: Quick for small batches, uses a common appliance.
Cons: Risk of over-processing or motor overheating, can be messy, requires attention.
The Crucial Step: Washing And Salting Your Butter
Once your cream has transformed into butter and buttermilk, the process isn’t quite finished. The “washing” stage is vital for both the flavor and the shelf life of your homemade butter. Salting is optional but adds flavor and further preservation.
Why Washing Is Essential
When butter forms, it traps small amounts of buttermilk within its structure. Buttermilk contains milk solids and sugars, which are prone to spoilage. If left in the butter, these components will shorten its shelf life and can impart a sour or off-flavor over time.
Washing the butter with cold water effectively removes these residual buttermilk particles.
Steps for Washing:
- Prepare Ice Water: Fill a large bowl with ice water.
- Rinse the Butter: Take the clump of butter from your churning device and place it in a separate bowl. Using a spatula or clean hands, press and knead the butter gently under cold running water or in the ice water bath.
- Change Water: Drain the milky water and repeat the rinsing and kneading process multiple times. Continue until the water runs clear, indicating that most of the buttermilk has been removed.
- Squeeze Out Excess Water: Gently press the butter against the side of the bowl to squeeze out as much water as possible.
Adding Salt (optional)
Salt acts as a natural preservative and enhances the flavor of butter. Whether you add salt is a matter of personal preference.
- Amount: For about 1 cup of butter, start with 1/4 to 1/2 teaspoon of salt. You can always add more to taste.
- Type of Salt: Fine sea salt or kosher salt dissolves best. Avoid coarse salts that might remain gritty.
- Incorporating Salt: Add the salt to the butter after the washing stage, while the butter is still moist. Knead it in thoroughly using your spatula or hands until it’s evenly distributed. Taste and adjust seasoning if needed.
Yield And Storage
After washing and salting, you’ll notice a slight decrease in the butter’s volume as excess water and some milk solids are removed.
- Yield: From 2.5 to 3 cups of heavy cream, you can expect to yield approximately 1 cup (about 1/2 pound or 227 grams) of butter.
- Storage:
- Refrigerator: Wrap homemade butter tightly in parchment paper or plastic wrap, or store it in an airtight container. It will typically keep well for 1-2 weeks. If salted, it may last a bit longer.
- Freezer: For longer storage, wrap the butter very well in plastic wrap and then in foil or a freezer bag. It can last for several months in the freezer. Thaw it in the refrigerator before use.
Troubleshooting Common Butter-making Issues
Even with the best intentions, you might encounter a few hiccups when making butter. Understanding these common issues can help you troubleshoot and achieve success.
Issue: Cream Won’t Separate / Takes Forever To Churn
This is often related to the temperature of the cream or the type of cream used.
- Too Cold: If the cream is too cold, the fat globules are too solid to easily coalesce. Try letting the cream sit at room temperature for 20-30 minutes, or slightly warm it by placing the container in a bowl of warm water for a few minutes.
- Too Warm: Conversely, if the cream is too warm (above 65-70°F or 18-21°C), the butter might become greasy and soft, making separation difficult. You can cool it down by adding a few ice cubes during churning (if using a mixer) or by chilling the cream slightly.
- Ultra-Pasteurized Cream: As mentioned earlier, UP cream can be more resistant. You might need to churn for longer or ensure the temperature is just right.
- Insufficient Fat: Double-check that you are using heavy cream or whipping cream with at least 30% milk fat. Lower fat content will not work.
Issue: Butter Is Greasy Or Soft
This usually happens when the cream is too warm during churning, causing the butterfat to become overly soft and incorporate too much liquid.
- Solution: Once you’ve achieved separation, proceed immediately to the washing stage with very cold ice water. Knead and rinse thoroughly. You might need to chill the butter in the refrigerator for a while to firm it up before shaping.
Issue: Too Much Buttermilk Left In The Butter
This is a common problem that impacts shelf life and flavor.
- Solution: Be diligent with the washing process. Knead the butter thoroughly under cold water, changing the water multiple times until it runs completely clear. Ensure you are squeezing out as much excess water as possible after the final rinse.
Issue: Butter Tastes “off” Or Spoils Quickly
This is almost always due to residual buttermilk or milk solids.
- Solution: Re-emphasize the importance of thorough washing. If you suspect spoilage, it’s best to discard the butter. For longer storage, always use salted butter and ensure it’s wrapped tightly and stored properly in the refrigerator or freezer.
Issue: Butter Is Too Salty Or Not Salty Enough
This is a matter of personal preference and adjusting the salt addition.
- Solution: When adding salt, start with a smaller amount (e.g., 1/4 teaspoon per cup of butter) and knead it in thoroughly. Taste a small piece and add more salt incrementally until you reach your desired flavor. Remember that salt also acts as a preservative, so if you plan to store it for longer, a bit more salt might be beneficial.
Flavoring Your Homemade Butter
While plain salted or unsalted butter is delicious on its own, infusing it with herbs, spices, or other ingredients can elevate your culinary creations. Homemade flavored butters are incredibly versatile, perfect for spreading on bread, melting over steak, or adding a gourmet touch to vegetables.
Sweet Butter Variations
- Honey Butter: Blend softened butter with honey to taste. A pinch of cinnamon or nutmeg can add warmth.
- Maple Butter: Mix softened butter with pure maple syrup. This is wonderful on pancakes, waffles, or corn on the cob.
- Cinnamon Sugar Butter: Combine softened butter with granulated sugar and cinnamon.
Savory Butter Variations
- Garlic Herb Butter: Finely mince fresh garlic (or use roasted garlic paste) and mix with chopped fresh herbs like parsley, chives, rosemary, or thyme. This is a classic for steak, seafood, or vegetables.
- Chili Lime Butter: Mix softened butter with lime zest, lime juice, and finely chopped red chili flakes or a dash of hot sauce. Great for corn, fish tacos, or grilled chicken.
- Mustard Butter: Blend softened butter with Dijon mustard, a pinch of black pepper, and a touch of Worcestershire sauce. Excellent with steak or roasted meats.
- Everything Bagel Butter: Mix softened butter with the seasonings from an “everything bagel” spice blend. Perfect for bagels, toast, or even roasted potatoes.
Tips for Making Flavored Butter:
- Soften Butter First: Ensure your butter is at room temperature (softened, but not melted) before mixing in other ingredients. This makes blending easier and more uniform.
- Finely Chop Add-ins: If using fresh herbs or garlic, mince them very finely to ensure they distribute evenly throughout the butter and don’t create large, uneven chunks.
- Mix Thoroughly: Use a spatula or a mixer on a low speed to incorporate all ingredients evenly.
- Chill to Firm: After mixing, you can shape the flavored butter into a log (by rolling it in parchment paper) or press it into small ramekins. Chill it in the refrigerator to firm up before serving or storing.
- Storage: Flavored butters, especially those with fresh ingredients like garlic or herbs, should be stored in the refrigerator and used within a week to maintain freshness.
Comparison: Butter Churning Methods
Choosing the right method depends on your available equipment, the amount of butter you want to make, and how much effort you’re willing to put in. Here’s a comparison of the most common techniques:
| Feature | Jar Method | Stand Mixer Method | Food Processor Method | Blender Method |
|---|---|---|---|---|
| **Effort Level** | High (manual) | Low | Low | Low to Medium |
| **Time** | 10-30 minutes | 5-10 minutes | 5-8 minutes | 3-7 minutes |
| **Batch Size** | Small | Medium to Large | Medium to Large | Small to Medium |
| **Equipment** | Jar, Cream | Stand Mixer, Cream | Food Processor, Cream | Blender, Cream |
| **Mess Factor** | Low to Medium | Medium (splashing) | Medium (splashing) | High (splashing potential) |
| **Best For** | Demonstrations, Small Batches | Efficiency, Larger Batches | Speed, Medium Batches | Quick Small Batches |
| **Cost** | Minimal | Moderate (appliance cost) | Moderate (appliance cost) | Low to Moderate |
Real-world Applications And Tips
Homemade butter isn’t just a novelty; it can genuinely enhance your cooking and baking.
- Baking: The richness and flavor of homemade butter can make a noticeable difference in cakes, cookies, and pastries. For flaky pie crusts, ensure your butter is very cold when incorporating it.
- Spreading: Nothing beats a thick slice of homemade butter on warm, crusty bread or a freshly baked scone.
- Finishing Dishes: A dollop of herb butter melted over grilled steak, fish, or steamed vegetables adds a luxurious finish.
- Sauces: Butter is a key component in many sauces, like hollandaise or beurre blanc. Using high-quality homemade butter can elevate these classics.
Pro Tip: Temperature Control Is Key
In my experience, the most significant factor in successful butter making is temperature. Always start with cold cream (around 50-55°F or 10-13°C). If using a stand mixer or food processor, don’t be afraid to pause and let the equipment cool down if it feels too warm, especially in a hot kitchen. This prevents the butterfat from becoming too soft and greasy.
Frequently Asked Questions
What Is The Best Type Of Cream To Use For Making Butter?
The best cream for making butter is heavy cream or whipping cream with a high milk fat content, ideally 30% or higher. Check the label for the specific fat percentage. Avoid creams with lower fat content like half-and-half, as they do not contain enough fat to form butter. While ultra-pasteurized cream can be used, it may take longer to churn and can sometimes be more challenging due to altered protein structures.
How Long Does It Typically Take To Make Butter?
The time it takes to make butter can vary significantly depending on the method used and the temperature of the cream. Using a stand mixer or food processor, it typically takes 5 to 10 minutes. The jar method can take anywhere from 10 to 30 minutes of vigorous shaking. Blenders might take 3 to 7 minutes. Consistency in agitation and the correct cream temperature are key factors.
Leave a Reply